Show Control
Onlyview features multiple capabilities to run a recurring show autonomously.
Running a show autonomously
Powering the main computer
The main computer will typically be auto-started each morning by one of two means:
Configuring the BIOS to auto-start at a given hour
Configuring an external device like an IPX 400 to turn the power on at a given hour, and configuring the BIOS to auto-start on power on (which should be done anyway to reboot after a power failure).
Starting Producer
Producer needs to be auto-started when Windows boots. This setup currently needs to be done manually. Press Ctrl-Shift-Esc to open the Windows’ Task Manager, go in the startup tasks tab, create a new one, and navigate to "C:\Program Files\Onlyview\ov_producer.exe"
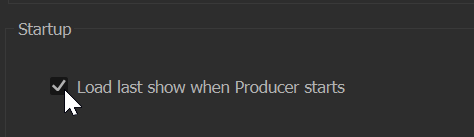
In Producer Options (File -> Producer Options), you also need to check “Load last show when Producer starts”, otherwise it will remain on the startup screen.
Powering the Displays
The Displays can be turned on either with the same mechanism, or via WakeOnLan (which must be enabled in each BIOS).
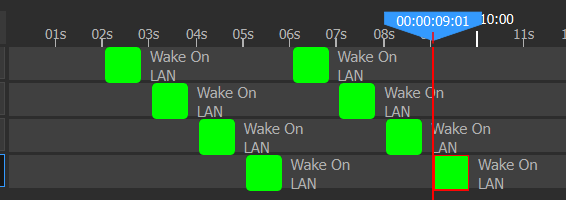
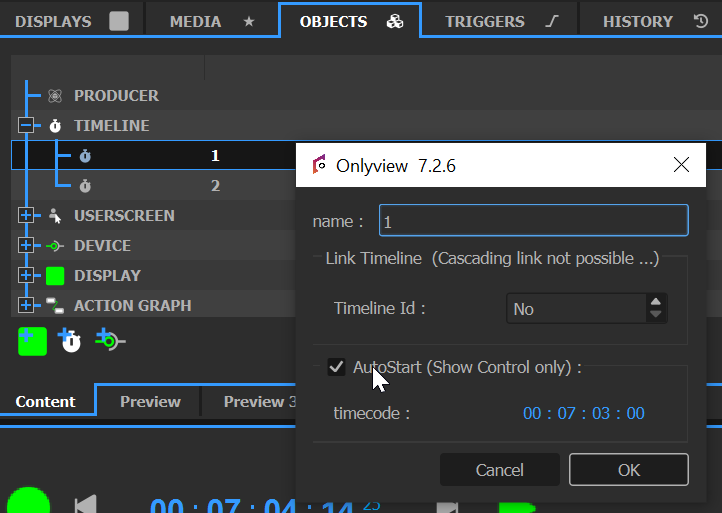
Create a new timeline dedicated to the show control, and make it auto-start :
Then, from the OBJECTS tab, drag&drop each Display in a Command layer, and select Wake On LAN. It is recommended to spread all the commands to avoid power consumption spikes.
Powering the projectors
Create a PJLink device for each projector, then add “Set Power On” CommandCues.
Automatically starting Displays
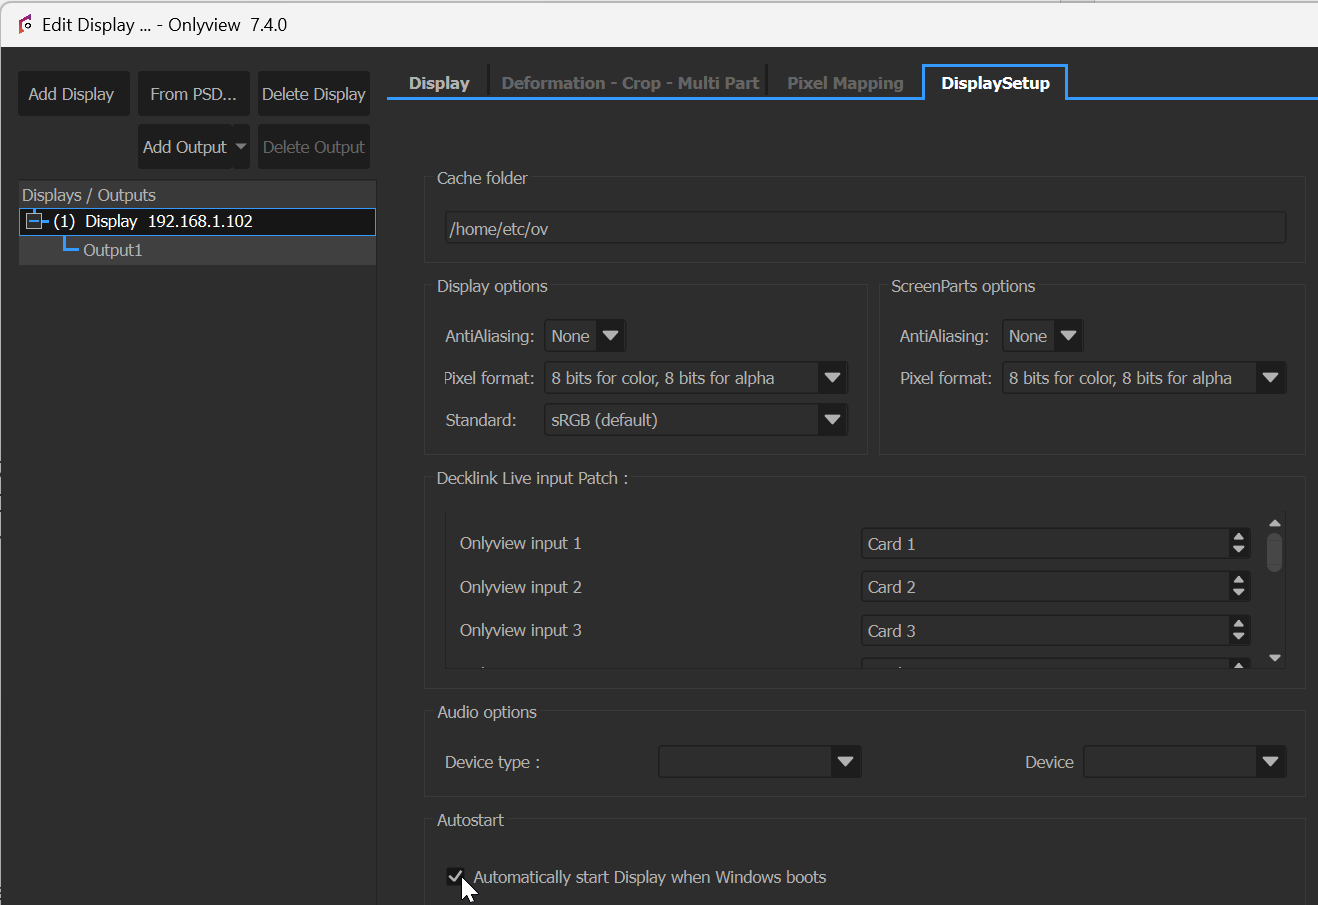
Onlyview’s installer configures Windows to automatically start Watchdog during boot. In turn, Watchdog can auto-start Display. You can configure this in DisplaySetup; either directly on the computer via displaysetup.exe, or via Producer. Double-click on a Display to open the Edit Display popup, select the desired Display, go in the DisplaySetup tab, and click “Automatically start Display when Windows boots”.
Connecting to the Displays
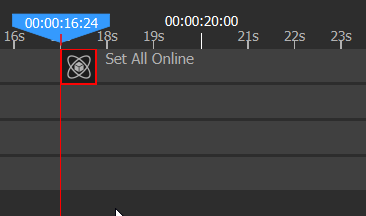
From the OBJECTS tab, drag the PRODUCER item on a Command layer, and create a “Set All Online” cue :
Start the show at a fixed hour
There are two main ways to handle this. You can either use a Clock device, or the ActionGraph. The ActionGraph method is more flexible, and will be used in the rest of this document, but this section explains both.
Clock device
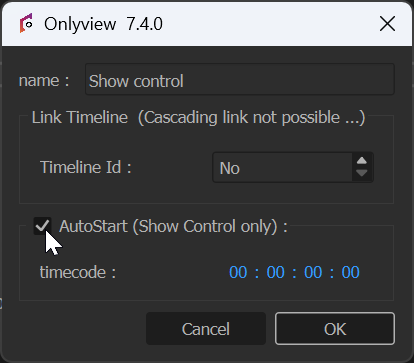
Create a Clock device
From the OBJECTS tab, drag & drop your ShowControl timeline into itself to create a new CommandCue
Selection action “Lock Tc”, and select your Clock device.
This way, when booting:
Producer will auto-start your show control timeline
This timeline will auto-lock to the clock
It will thus automatically locate to the current time
You can then add LocatePlay CommandCues at 8am, for instance.
ActionGraph
Create an “On Time” node, and connect it to a “Timeline controls” node, in which you can start a timeline at a given timecode.
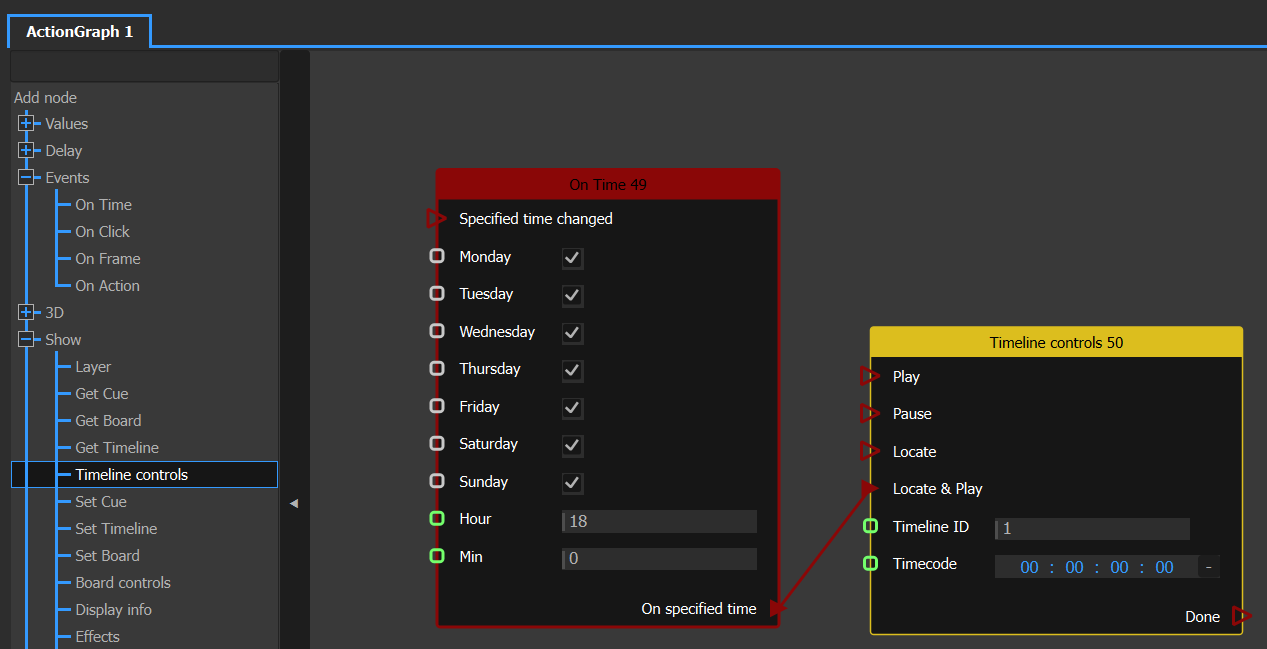
You can also have different hours for different days by adding a second On Time node.
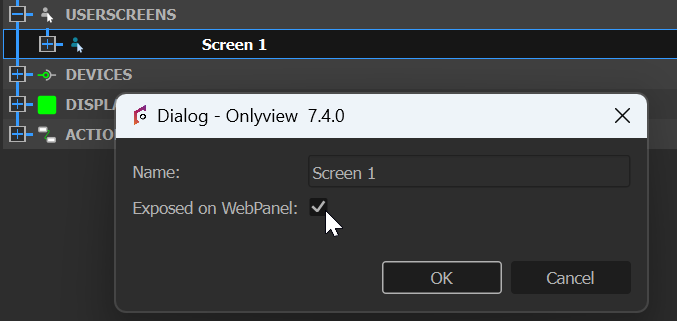
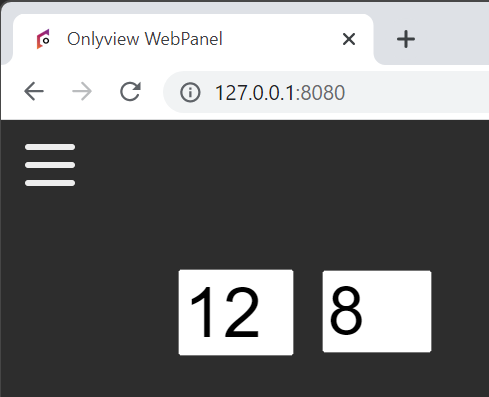
Make the start time configurable from the WebPanel
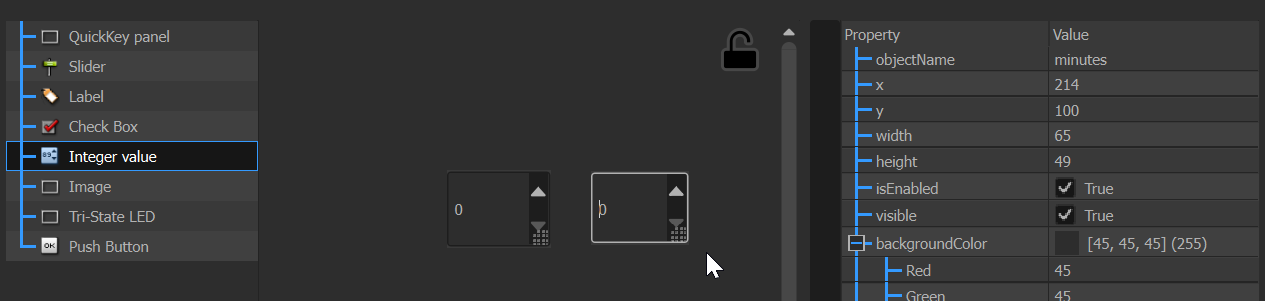
In a UserScreen, add two Integer Value widgets
(don’t forget to re-lock the UserScreen afterwards)

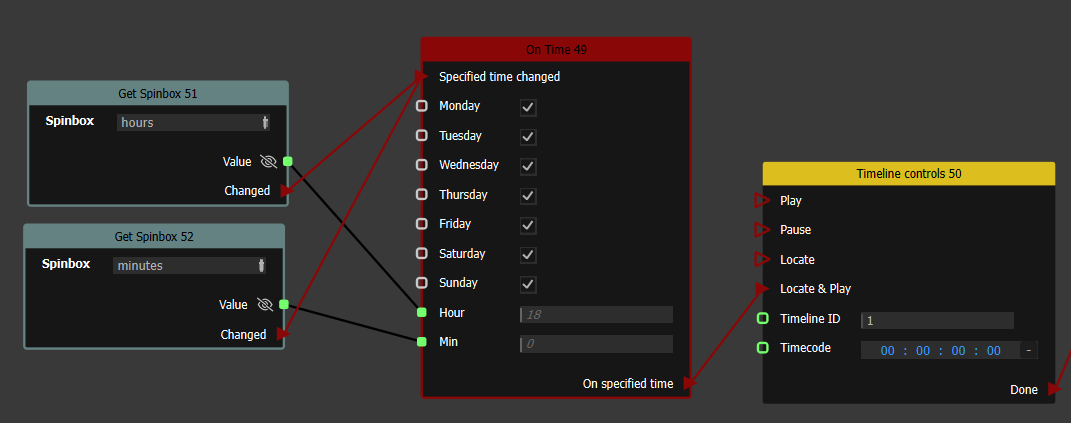
In the ActionGraph, add 2 “Get Spinbox” nodes. Pick each widget : press on the small picker, then drag it over the desired widget in the userscreen

Connect “Value” to “Hour” and “Minute” respectively
Connect “Changed” to “Specified time changed”; this way, each click on the spinbox will update the timer.
If needed, you can make this interface accessible via the WebPanel.
Controlling external equipment
Onlyview can control, and be controlled by, many protocols. Please refer to the Devices section.
Standalone Displays
During a normal show, the Displays are controlled by Producer. However, for fixed installations, Onlyview can also operate in “standalone” mode, without a dedicated Producer.
One of the Displays operates as the Cluster Master – it acts as the Producer. The other Displays work as usual.
Initial setup
First, the show needs to be built normally, with Producer. Once it is ok, make sure to do an Online (Ctrl-O). This will save the show on each Display, in the cache folder, for later access (usually: D:/cacheV3/{ShowName}/show.xml)
Then, configure one of the Displays as the Producer replacement: In the Edit Display dialog, go in the DisplaySetup tab :
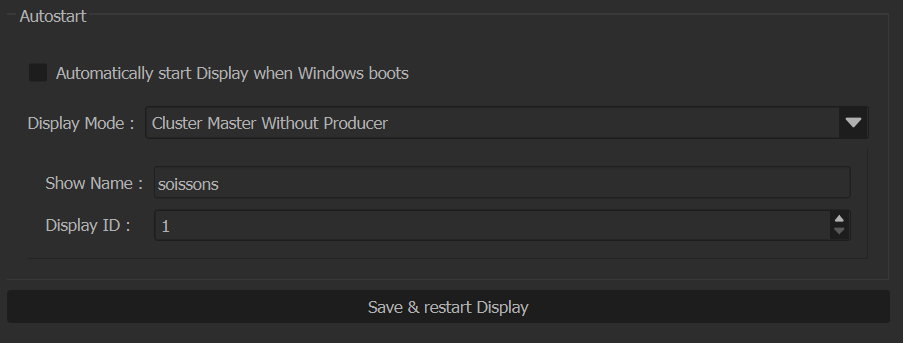
Select “Cluster Master Without Producer”.
The show name must be the name of your .olv file, but without the extension. For instance, if your show is “soissons.olv”, enter “soissons”. If you’re unsure, this is the folder name in the cache folder (D:/cacheV3/).
Display ID corresponds to which Display the cluster master is, in the Display List. It is usually 1.
During normal operations, you will probably want to check “Automatically start Display when Windows boots”.
These settings can also be configured directly on the Display, using Display Setup, in the Permanent Installation tab.
Running the show
Once these settings are applied, Producer can be closed. When starting, the Cluster Master will:
Automatically put all the Displays Online
Start the timelines which are configured to auto-start:
You can now configure an auto-boot in the computer’s BIOS, or use a third-party system to Wake On Lan. All the servers will boot, start Display, and the Cluster Master will put them Online.
Updating the show
If you need to update the show at some point, you can re-connect a Producer in the network.
You can keep the Cluster Master as-is – no need to reconfigure it in a Normal Display.
Once your changes are done, you need to do a last Ctrl-O, so that all the Displays have their own up-to-date show. Make sure that all Displays are shown in green, otherwise some Displays will not play the correct content.
Solo
If you have a simple show with just one Display and no Producer,
A Display can also be configured in Solo mode; in this case, the show should only contain one Display, and the Solo Display will run alone, without making any network communication.
Troubleshooting
The changes are not propagated from Producer
When the Cluster Master does an Online, it assumes that all the other Displays have an up-to-date copy of the show, and of all the media – it is Producer’s job to upload all these files. So at startup, the Cluster Master does NOT re-upload the show.
The consequence is that you absolutely need to do a Ctrl-O on all Displays before using the Cluster Master mode. Just doing a Ctrl-S in Producer as usual is not enough.
The Displays don’t play anything after a reboot
When the Cluster Master starts, it immediately does an Online. So at that point, all the other Displays must already be up-and-running (showing black).
The best way to handle this is to enable the “Auto-reconnect” feature in the show options (File -> Show options).
You can also make the Cluster Master boot one or two minutes later. This way, when it starts, all the normal Displays will be ready, and the Online will succeed.
The Displays are not in sync with the Cluster Master
When starting the Cluster Master, the Displays may show content, but not at the correct timecode. The system can take up to 10 seconds to synchronize.
Remote control
Producer itself can be controlled by an external software. The current show can thus be changed remotely, different sequences can be triggered…
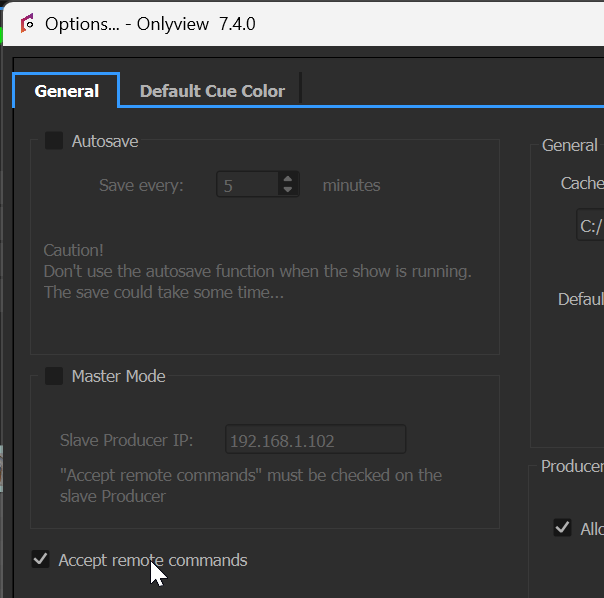
“Accept remote commands” must be checked in Producer options (File -> Producer options).
In the content tab, the status icon will turn green when the control software connects, and red when the connection is lost.

It is also possible to directly control a Display, if it acts as a Producer (Cluster Master or Solo; see the “Standalone Displays” section). In this case, only the following actions are executed: Pause, Loop, Timeline Actions (except lock / unlock timecode), Screen Action. Other actions are ignored.
Network protocol
Producer listens for TCP/IP connections on port 3055.
Command are utf-8 encoded
Commands are terminated by a 0x0A character (‘\n’)
Arguments are separated by “*”
loadshow*path_to_olv [M]
Loads a show.
Ex: loadshow*c:\\test.olv
Does not automatically put all the Displays online.
play*timelineID*timecode [M][S][C]
Plays a specific timeline at the given timecode. If the timecode is omitted, the timeline continues from its current position. The timecode is either expressed in milliseconds, or in HH:MM:SS:mmm format, with mmm in milliseconds.
Ex: play*1*1000 plays timeline 1 at 1 second.
locate*timelineID*timecode [M][S][C]
Locates a timeline at the given timecode, and pauses it.
setgrandmaster*timelineID*position*fadetime [M][S][C]
Executes a fading of a timeline’s GrandMaster.
position: Between 0 (black) and 100 (full).
fadetime: transition time in milliseconds.
Ex: setgrandmaster*3*100*4000 : timeline 3 fades in, in 4 seconds.
settimelineon*timelineID*on [M][S][C]
Turns a timeline on or off.
on: 0 for off, 1 for on.
resetblind*timelineID [M][S][C]
Resets all the layers’ blinds on a timeline
setlayerblind*timelineID*type*layerID*state [M][S][C]
Blinds or unblinds a layer.
type: 0 for command layers, 2 for media layers.
state: 1 for blind, 0 for normal
resetsolo*timelineID [M][S][C]
Removes all the solo flags on the layers of a timeline
setlayersolo*timelineID*type*layerID*state [M][S][C]
Sets a layer in solo mode.
type: 0 for command layers, 2 for media layers.
state: 1 for solo, 0 for normal
launchquickkey*quickkeyID [M]
Executes a quickkey
online [M]
Producer only. Puts all the Displays Online.
offline [M]
Producer only. Disconnects from all the Displays
shutdownmaster [M]
Producer only. Turns off the computer.
rebootmaster [M]
Producer only. Reboots the computer.
statetimeline*timelineID [M][S][C]
Returns the state of a timeline.
Ex: statetimeline*4 will send back statetimeline*4*[on]*[timecode]*[gm]
on: 0 for off, 1 for on
timecode: the timecode in milliseconds
gm: the grandmaster between 0 and 100.
positiontimeline*timelineID [M][S][C]
Returns the timecode of a timeline.
Ex: positiontimeline*4 will send back positiontimeline*4*[timecode]
timecode: the timecode in milliseconds
screenstatus*displayID [M][S][C]
Returns the status of a Display
Ex: screenstatus*4 will send back the state of Display #4 : screenstatus*4*[state]
state: 0 if never connected yet; 1 if disconnected; 2 if connection in progress; 3 if connected; 4 if error.
shutdownscreen*displayID [M][S][C]
Turns off a computer.
rebootscreen*displayID [M][S][C]
Reboots a computer.
wolscreen*displayID [M][S][C]
Sends a Wake On LAN to a computer.
The WOL feature must be enabled in the BIOS, and the master must know the MAC address of the target Display. The normal way for this, is to make a normal Ctrl-O once during the installation.
displaytestpattern*num [M][S][C]
Shows a test pattern
Id=0 : None
Id=1 : Small Test Pattern
Id=2 : Horizontal Black Level
Id=3 : Vertical Black Level
Id=4 : Chessboard
Id=5 : Onlyview Logo
Id=6 : SMPTE SD ColorBar
Id=7 : SMPTE HD ColorBar
Id=8 : OSD