Timelines
Basic usage
Onlyview shows are organized using timelines. A timeline contains multiple cues, which will be played sequentially.
Timelines contain multiple layers: you can play multiple cues at the same time.
A show contains multiple timelines, that can be re-arranged.
Special cues can automatically play, pause, or jump on the timeline.
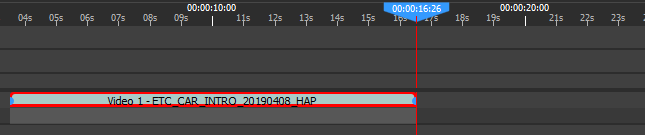
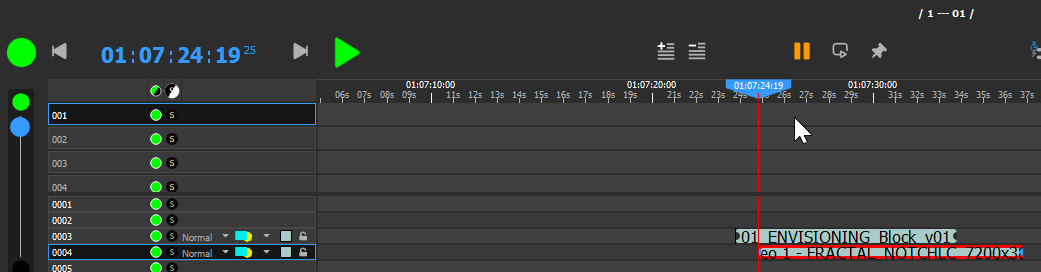
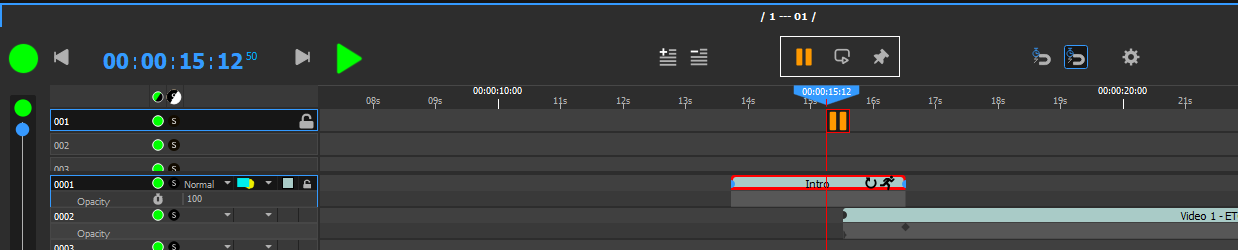
The red locator shows where the currently-edited timeline is playing. The “current time” is known as the timecode.
Cues
Cues allow you to play video and audio content. They lay on the timeline and must also be positioned and adjusted in the 2D preview.
To create a cue, drag&drop a media from the media list to the timeline.
The cue can then be moved in time, rescaled, and offer multiple options, like opacity, color, playback speed, etc.
Layers
Timelines are organized in layers. Layers are used to play multiple cues at the same time. This is useful in many cases. Examples include:
Playing a different media in each Media Server. For instance, the main media in the center, and a camera feed on the sides.
Overlaying multiple media. For instance, when compositing multiple layers using alpha transparency.
Complex deformations. In a 2D workflow on complex surfaces, deformations often need to be done in multiple pieces; each small piece of deformation can be done using a separate cue.
Complex masks. On complex surfaces, simple softedges are not sufficient, and multiple small softedges must be manually added to finetune the result.
The add/delete buttons can create and remove layers from the current timeline.
Multiple timelines
A single show can contain multiple timelines, each playing at a different timecode.
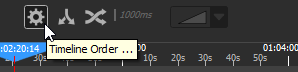
To add a new timeline, go to Objects->timelines->right click->create timeline.
The timelines are drawn sequentially, from left to right in Producer’s order. This order can be rearranged using the Timelines Setup dialog.
Timeline can be turned on and off. They also have a grandmaster, which handles the opacity of the whole timeline.
Media cues
Common parameters
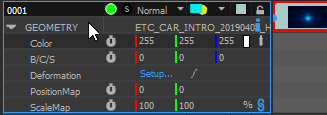
Commonly-used parameters are directly accessible in the timeline: opacity, position, rotation, scale, color, etc.

There are two tabs of parameters, which can be switched by clicking on the first line
The F1…F11 keys give a direct access to each of these parameters in a compact mode:
F1: Opacity (also called Fade)
F2: Cue position on the stage
F3: Cue scale. Can be set in % or in pixels.
F4: Cue rotation, in degrees + full turns
F5: Cue anchor, the rotation center of the cue
F6: Cue color
F7: Brightness/Contrast/Saturation, for quick color adjustments
F8: Cue deformation
F9: Texture coordinates offset
F10: Texture coordinates scaling
F11: Texture coordinates rotation
Opacity has quick-access keys: Numpad0 forces the opacity to 0, Numpad1/ Numpad2/… Numpad9 to 10%/20%/… 90% respectively, and Ctrl-Numpad0 forces the opacity to 100%.
Once in compact mode, click on the left part to return to expanded mode:

Cue setup dialog
Double-clicking on a cue opens the Cue setup dialog.
Editable parameters are:
Start time: the timecode at which the cue starts. Changing this value is equivalent to dragging the cue on the timeline.
Duration: how long will the cue last. Changing this value is equivalent to dragging one of the extremity of the cue on the timeline.
End time: the timecode at which the cue starts. When editing this value, the duration will remain constant, so the start time will be adjusted.
Preload: How long in advance the media will be loaded in memory, ready to be played. By default, there is an invisible 10 second preload on all cues, so that hitting a new cue does not create a performance hiccup. This can be extended using this setting.
Name: The name of the cue shown in the timeline. Can be anything, but by default, contains the name of the media.
Anamorphic: Extra scaling factor to compensate for media with built-in vertical scaling.
Rewind: Allows to play back the movie in reverse. Only available with image sequences.
Loop and freerun: see the dedicated section below
In/Out: cuts parts of the cue at the start and the end of the media.
Speed: Playback speed factor. By default, plays at 1x the media speed.
Border: an extra border on the media
Drop shadow: like the border, but only on one side
Crop: crops the edges of the cue
Vector Masks: Allows creating complex animated masks using Bézier curves for precise control over which parts of the cue are visible. Each cue can have multiple vector masks that can be animated over time. Vector masks support keyframe animation, allowing shapes to change position, size, and form throughout the duration of the cue. This is particularly useful for rotoscoping work or creating complex reveals and transitions.
Hide On Screen: This feature is similar to the Selective Upload for media, but on a cue-by-cue basis and with different functionality. “Force Hide” completely disables the cue on specific Media Servers. “Force Show” forces the decoding of the media, even if the cue is not visible. While this is usually not needed, it can prevent performance hiccups if a cue suddenly moves on a new Media Server, for instance due to tracking.
Note: This is different from media-level Selective Upload, which controls whether media files are downloaded to Media Servers, while cue-level Hide On Screen controls whether individual cues are rendered on specific Media Servers.
Some media types have extra parameters:
On audio cues, tracks of the input media can be routed to different output channels.
Notch media can be given TextureAreas as inputs, so that they can be procedurally edited.
3D scenes (.ov3d files), when put in Flat mode, handle the cue resolution here.
Loop & freerun
The Loop option makes the media go back at the start when reaching the end.
This is not useful in itself, because reaching the end of the media means that we will leave the cue:
However, the cue can be extended to be longer than the media:
A black vertical mark will show when the media wraps around.
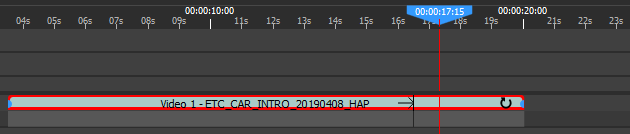
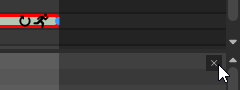
If the cue is not in loop mode (the default), the last frame of the media will be kept. A looping cue will have a small loop indicator on the right
If the cue is in loop mode, the media will wrap.
Looping takes in/out into account: if you crop 1 second of a 10-second movie, then the media will loop every 9 seconds.
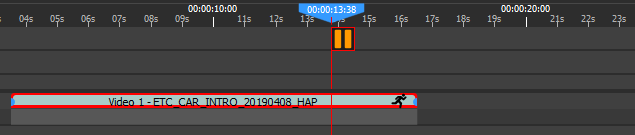
Freerun makes the cue handle time by itself. As soon as the cue starts playing, the cue will entirely ignore the timeline’s timecode. In particular, this means that pausing the timeline will not impact freerun cues, which will continue playing:
Freerun is often used in conjunction with Loop; otherwise, the freerun cue will continue playing the last frame of the media.
The only way to stop showing the cue is to move the locator outside of the cue. This will also reinitialize the internal timecode, so exiting and re-entering the cue starts playing the media at the expected timecode.
Animations
Most cue parameters can be animated on the timeline. This is done by clicking on the stopwatch icon:

Changing an animated value will automatically create a new keyframe.
To delete a keyframe, select it and press Suppr.
Animations can be used to create transitions between cues. In this case, it is particularly handy to know common keyboard shortcuts:
Select the cue, the press O (go to end of selection; opposite key is I)
Press T to jump back 1 sec before (opposite key is Y; there are also Ctrl and Alt variants).
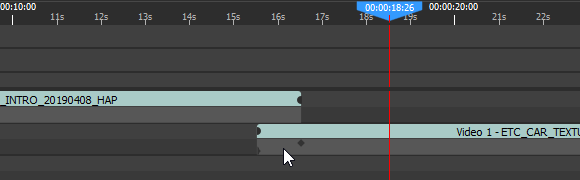
Drop the new media on layer 2. It will then start one second before the end of the other cue.
Press Shift-F1. This will add an opacity keyframe – and thus create an animation.
Press 0 to set this keyframe to full transparency
Press Y to jump to the end of the crossfade
Press Ctrl-0 to set this keyframe to full opacity
This will give you a 1 second crossfade:
Cue view
Ctrl+double-clicking (or right-click -> Edit all cues parameters) on a cue gives access to a new panel, on which more cue parameters can be edited. In particular, it shows the Effects options.
To exit the cue view, close it in the top-right corner, or ctrl-double click on an empty area of the timeline.
While the cue view is active, some actions are locked, like deleting the cue.
Vector Masks
Vector Masks provide advanced masking capabilities using animated Bézier curves. This can be used for precise compositing work, rotoscoping, and creating animated reveals.
Overview
Each media cue can have multiple vector masks that define which parts of the content are visible. Unlike simple crop operations, vector masks use smooth Bézier curves that can create organic, flowing shapes. These masks can be animated over time.
Creating Vector Masks
To add the first vector mask to a cue:
- Select the desired cue in the timeline
- In the 2D preview, in the right panel, click on the “Vector masks” icon to switch to vector mask editing
- Just below, select the “add points” tool
- Start tracing
The full list of masks can be accessed in the list of all cue parameters:
- Select the desired cue in the timeline
- Right click -> Edit all cue parameters (or : Ctrl-double-click on the cue)
- In the bottom panel that opens, navigate to the Vector Masks section
- Click “Add Shape” to create a new mask
Working with Shapes
Each vector mask is defined by a series of control points that form a closed shape:
- Opacity: Controls how strongly the mask is applied (0-100%)
- Feathering: Softens the edges of the mask for smoother transitions
- Mask Invert: When off (the default), the drawn path describes the visible zone. When off, if describes the hidden zone, and the rest of the image is visible instead.
- AND mode: When off (the default), the visible zone of this mask is added to the previous masks, expanding the visible zone. When on, only the zones that are visible in the current AND the previous mask are visible.
Animation and Keyframes
Vector masks support full keyframe animation:
- Position Animation: Move the entire mask over time
- Shape Animation: Change the form of the mask by animating individual control points
- Opacity Animation: Fade masks in and out
- Feathering Animation: Vary the softness of edges over time
To animate a mask property: 1. Position the timeline at the desired time 2. Modify the mask property (position, shape, opacity, or feathering) 3. A keyframe is automatically created 4. Move to a different time and change the property again to create motion
Layers
Media cues are organized in layers. Layers are shown from top to bottom, so a cue placed in layer 1 can be hidden by a cue on layer 2.
Adding and removing layers
By default, new timelines have 40 layers, but you can add more, or delete existing ones.

Collapse / expand
Each layer can be individually expanded: it will take more space vertically. To toggle between collapsed and expanded mode, click on the left part of the layer:
All layers can also be expanded/collapsed at once using the dedicated buttons:
Expanded layers can either be “compressed” and show a single parameter, or fully expanded. To show a single parameter, select a cue, and press the function key of the desired parameter : F1 for opacity, F2 for position, etc.
To fully re-expand the layer, click on the left part :

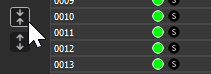
On/off and Solo
Each layer can be individually turned on or off using the green
button.
Layers can also be solo’ed using the “s” button. Only solo layers are
visible. Note that multiple layers can be solo at the same time.
Interacting with the timeline
Each timeline has:
An on/off button, to completely hide the whole timeline.
A GrandMaster, on the left. Clicking on the black and green buttons will make the grandmaster automatically fade in a user-configurable time (by default, 3 seconds).
A play/pause button
A current timecode
A locator that can be dragged using the mouse, or controlled using keyboard shortcuts.
Timeline setup

Link Timeline: Doing play/pause/locate actions on the current timeline triggers the same actions on the linked timeline.
AutoStart: If enabled, the timeline will automatically play when Producer starts. This is mostly useful for show control, like starting the Media Servers via WakeOnLan or similar actions. See the Command Cues chapter for details on how to add actions on a timeline.
Multiple timelines
New timelines can be created in the Content window, Objects tab
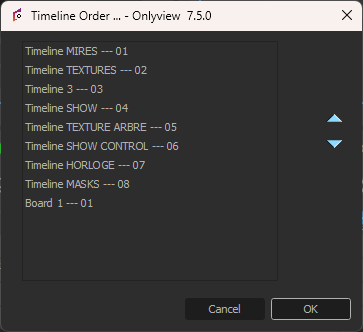
Timelines can be re-ordered:

Just as layers are rendered top to bottom, timelines are rendered left to right. Normally, this means that a cue in Timeline 2 can hide a cue in Timeline 1. But if timelines are reordered, Timeline 2 can be shown first (so, below).
Dual Locator
Normally, changing the timecode by dragging the Locator is immediately taken into account by all Media Servers.
The Dual Locator makes it possible to edit or preview a part of the Timeline, while Media Server runs at a different timecode.
To enable the Dual Locator, press the following button:

The timeline will now show two locators, the usual blue one, and a yellow one.
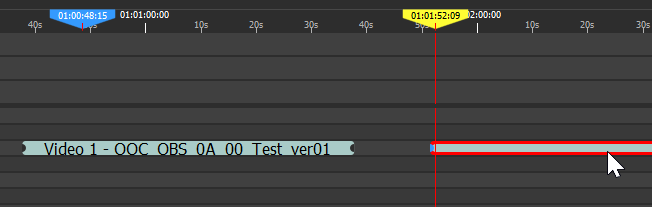
The blue one shows what Media Server is playing. The yellow one is the “working” locator, used to add cues, animations, etc.
All changes are live; in particular, care should be taken to avoid adding cues in a zone where Media Server is playing.
Usual keyboard shortcuts like Space, T, Y, etc, work and are applied on the yellow locator. In order to play/pause/locate the Media Servers, you have to explicitly exit the Dual Locator mode by re-clicking on the button.
Auto-crossfade
Auto-crossfade lets you jump from any point to any other point in a timeline, without any hard cut, and without the need to pre-encode a transition.
For instance, this is what a traditional, keyframe-animated crossfade looks like:
The cues must be precisely positioned, and opacity keyframes must be hand-placed.
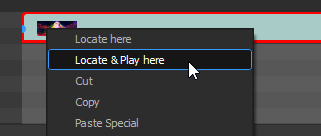
On the contrary, when auto-crossfade is enabled, the cues can be anywhere, without any special preparation. Just right-click on a cue, and select “Locate & Play here”:
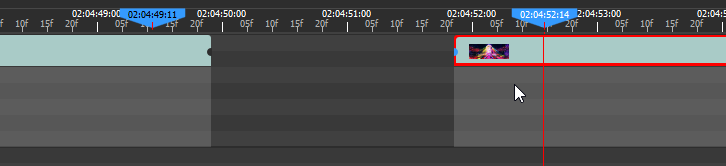
For 1 second, Onlyview will smoothly crossfade between the two cues. On the timeline, two locators will be playing:
Auto-crossfade is enabled using this button:
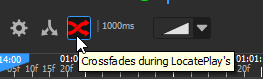
The duration of the crossfade can be configured per-timeline, as well as the crossfade type:
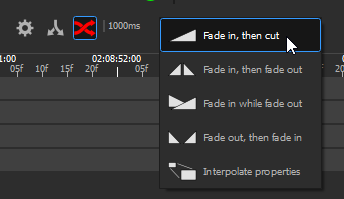
Fade in, then cut: The old cue keeps playing at 100% opacity; the new cue starts at 0% opacity, and gradually ramps up to 100%. At the end, the old cue is cut, and only the new cue remains. This is the default, since it gives the best result for video.
Fade in, then fade out: The old cue keeps playing at 100% opacity; the new cue starts at 0% opacity, and gradually ramps up to 100%. In a second step, the old cue fades out to 0%, and only the new cue remains.
Fade in while fade out: The old cue fades from 100% to 0% while the new cue fades from 0% to 100%, at the same time. This is generally undesirable for video, because in the middle, both will be at 50%, giving a dark appearance. However, this is desirable for audio, because it keeps the general audio level constant. Thus, all audio cues use this mode, regardless of what the user actually chose as a global timeline parameter.
Fade out, then fade in: This is a fade-to-black.
Interpolate properties: Allows to smoothly transition between 2 cue positions. All the animatable cue properties can be interpolated: position, color, effect parameters, masks, etc.
Command Cues
Command Cues are a way of controlling the show. Using Command Cues, you can encode pauses, jumps, and other actions that should happen at specific timecodes.
All actions that are configurable using Command Cues can also be triggered using QuickKeys. Use Command Cues to trigger the action automatically when playing a timeline; use QuickKeys to trigger the action manually, using the mouse.
Playback control
Simple playback control Command Cues are accessible directly on the timeline window:
Command Cues are inserted in the top part of the timeline, in the Command Layers.
Available cues are:
Pause: Pauses the timeline (Shift-P)
Loop: Jumps to another timecode of the same timeline (Shift-J)
Marker: Does not do anything, just a marker on which you can add a name. Helps navigating the timeline (Shift-P)
Loops have two parameters, which are accessed using double-click:
Time: The timecode where the cue is placed at.
Loop To: The timecode where the timeline should jump when playing the cue.
Producer control
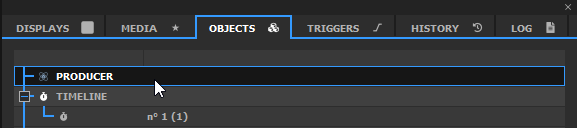
You can also encode actions that control Producer itself. In the OBJECTS tab, the first item is PRODUCER. This item can be drag&dropped on the timeline.
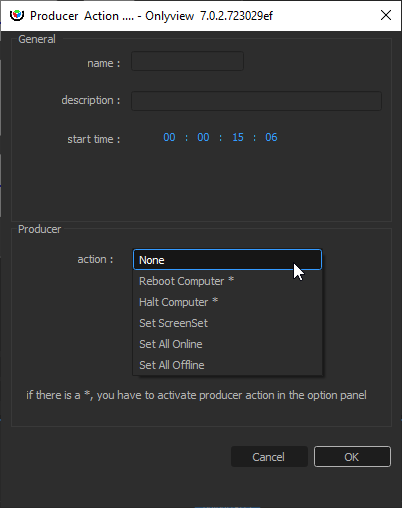
Available actions are:
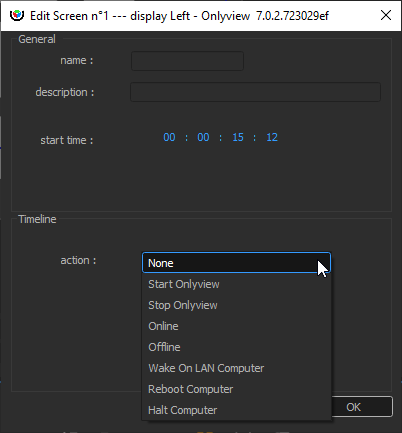
Reboot Computer: Reboots the Producer computer
Halt Computer: Shutdowns the Producer computer
Set ScreenSet: Media Servers can have multiple configurations. You can switch between them.
Set All Online: Puts all Media Servers Online, like Ctrl-O
Set All Offline: Disconnects from all Media Servers.
For Reboot and Halt to be effective, navigate to File->Options, and in the General tab, tick “Allow dangerous Producer actions”. Otherwise, these actions will be ignored. Before shutdown, Producer will warn you, and will give you 10 seconds to abort. If the procedure is not aborted, Producer will close without saving any changes to the project, and shutdown/reboot the computer.
Media Server control
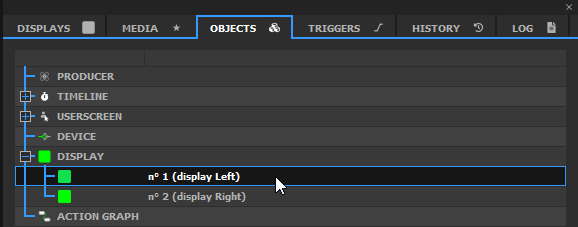
Individual Media Servers can also be controlled. Just like Producer actions, this is done by drag&dropping the Media Server in a Command Layer:
Start Onlyview: Ask watchdog.exe to start display.exe
Stop Onlyview: Ask watchdog.exe to stop display.exe
Online: Put this particular Media Server online
Offline: Disconnects from this Media Server
Wake On LAN: Sends a WOL packet to the Media Server computer. The BIOS must be configured to accept this; the Media Server’s MAC address must be exact in the Edit Media Server dialog (an easy way to do this is to Online the Media Server; this will update the MAC address). This command is usually followed by a 2-min gap in the timeline, followed by Start Onlyview and Online commands.
Reboot Computer/Halt Computer: Reboots/Shutdowns the Media Server computer.
Action Graph controls
Nodes of Action Graphs can be inserted on Command Layers. Right-click on a node to access the feature:
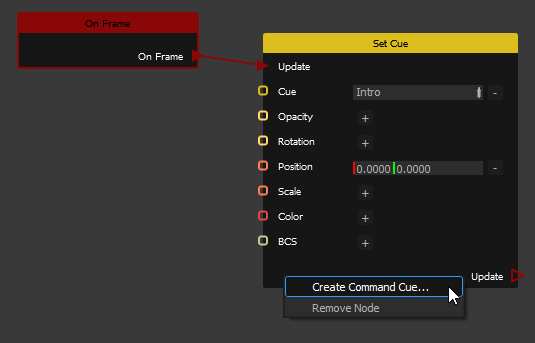
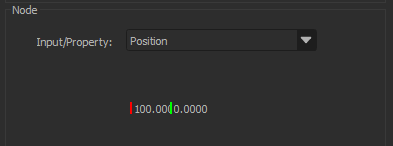
By editing the new cue, you can trigger changes in any editable value. In this example, a media is moved 100 pixels to the right:
Devices controls
Some devices can also be dropped on the timeline, in particular the timecode devices. See the Device chapter for mode details.
Full reference
Timeline & boards shortcuts
- Rubber band: Left click & drag
- Prevous timeline/board: Ctrl + Page up
- Next timeline/board: Ctrl + Page down
- Toggle dual locator: ALT + D
- Play/pause: Space
- Locate: L
- Go to previous frame: Ctrl + T
- Go to next frame: Ctrl + Y
- Go to previous second: T
- Go to next second: Y
(except for boards)
- Contextual menu: Right click
- Zoom: Alt + Wheel
- Select all cues: Ctrl + A
- Select cues before the locator: Ctrl + B
- Select cues after the locator: Ctrl + E
- Locate to the beginning: Ctrl + Alt + B
- Show layer: Ctrl + L
- Go to selection beginning: I
- Go to selection end: O
- Go forward: Alt + Y
- Go backward: Alt + T
- Add marker: Shift + M
- Add pause action: Shift + P
- Add loop action: Shift + L
Timeline layer shortcuts
- Expand all layers: Alt + L
- Collapse all layers: SHIFT + Alt + L
- Select previous media layer and unselect cues: P
- Select next media layer and unselect cues: M
- Select previous media layer keeping cues selection: Ctrl + P
- Select next media layer keeping cues selection: Ctrl + M
- Go to previous cue: J
- Go to next cue: K
Timeline cues shortcuts
- Select cue: Left click
- Toggle cue selection: Ctrl + Left click
- Move cue selection: Left click & drag
- Copy: Ctrl + C
- Cut: Ctrl + X
- Paste: Ctrl + V
- Paste special: Ctrl + Alt + V
- Remove: Delete
- Add cue at specific position: Alt + Drag and drop media on Timeline/Board
- Cue edition: Left double click
(except for command cues)
- Opacity to 0% (10%, 20%, 30%...): 0 (1, 2, 3...)
- Opacity to 100%: Ctrl + 0
- Brightness to 0% (10%, 20%, 30%...): Alt + 0 (Alt + 1, Alt + 2, Alt + 3...)
- Brightness to 100%: Ctrl + Alt + 0
- Brightness to -10% (-20%, -30%, -40%...): Shift + Alt + 1 (Shift + Alt + 2, Shift + Alt + 3, Shift + Alt + 4...)
- Brightness to -100%: Ctrl + Shift + Alt 0
(except for board cues)
- Contextual menu: Right click
- Move cue selection to locator: Shift + Left click
- Move cue from layer keeping the timecode: Alt + Left click & drag
- Resize cue duration: Left click & drag left or right border
- Cue extra parameters edition: Ctrl + Left double click
- Close cue extra parameters: Ctrl + Left double click outside the cue zone
- Move cues (-1 frame): -
- Move cues (+1 frame): +
- Move cues (-1 second): Ctrl + -
- Move cues (+1 second): Ctrl + +
- Move cues backward: Alt + -
- Move cues forward: Alt + +
- Align start of cues to the locator: Ctrl + Shift + I
- Align end of cues to the locator: Ctrl + Shift + O
- Extend/Cut start of cues to the locator : Alt + I
- Extend/Cut end of cues to the locator: Alt + O
- Show opacity (position, rotation, scale...) parameter: F1 (F2, F3, F4...)
- Show and edit opacity (position, rotation, scale...) parameter: Alt + Shift + F1 (Alt + Shift + F2, Alt + Shift + F3, Alt + Shift + F4...)
- Paste opacity (position, rotation, scale...) parameter: Ctrl + F1 (F2, F3, F4...)
Animation keys
- Contextual menu: Right click
- Add an opacity (position, rotation, scale...) animation key at locator's timecode: Shift + F1 (F2, F3, F4...)
- Remove an opacity (position, rotation, scale...) animation key at locator's timecode: Ctrl + Shift + F1 (F2, F3, F4...)
- Toggle key selection: Ctrl + Left click
- Move key selection to locator: Shift + Left click
- Copy key selection: Ctrl + C
- Cut key selection: Ctrl + X
- Paste key selection: Ctrl + V
- Go to previous animation key frame: Shift + J
- Go to next animation key frame: Shift + K