2D preview
The 2D preview is where cues are positioned and deformed.
The different features are:
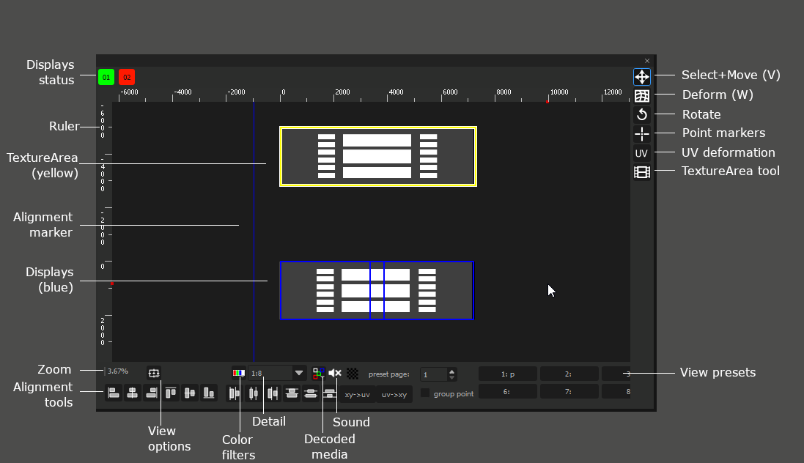
The top part lists the Media Servers and shows their status. It is possible to right-click on the icons to Online/Offline individual Media Servers.
Right part
The right part gives access to the different preview modes. The modes are:
Select+Move. Keyboard shortcut: V. This is the default mode.
Middle mouse button pans
Mouse wheel zooms
Left click selects/deselect
Left drag moves cues
Shift+drag on a cue rescales cues
Rotate. Keyboard shortcut: R. Rotates the selected cue.
Point markers: Clicking on the 2D preview in this mode will create 2D markers. They can be shown/hidden using the View options dropdown (bottom-left part of the preview). 2D markers are visible both on Producer and on the Media Server.
Deform. Keyboard shortcut: W. Enable deformation on a cue first (select the cue, press F8, click “Setup” on the left of the timeline, validate). Then, each editable point can me moved, either by mouse, or using keyboard shortcuts. The shortcuts are:
Arrows: Moves the point(s)
Ctrl-Arrows: Moves the points(s), faster
Alt-Arrows: Changes selected point
Alt-Shift-Arrows: Same, but keeps the previous point(s) selected (additive selection).
Alt-Ctrl-Arrows: Selects a full horizontal or vertical line of points.
Ctrl-Alt-Shift-Arrows: Selects the next full horizontal or vertical line of points; keeps the current selection. Allows for very fast selection of big zones.
UV deformations. Keyboard shortcut: Shift-W. Same as Deform tool, but edits the texture coordinates of the deformed cue instead.
TextureAreas. Shows the TextureAreas names & resolutions; Dragging a TextureArea moves it; dragging a corner rescales it; A mouse drag on the background creates a new TextureArea.
Bottom part
The bottom part gives access to various other tools:
Zoom: The zoom level of the preview. 100% means: 1 stage unit = 1 screen pixel.
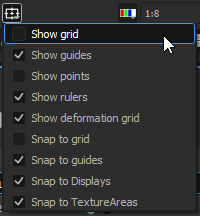
View options:
Show grid: The preview will show a grid of 100 pixels.
Show guides: Guides are vertical and horizontal lines that can be added to easily align content. To add a guide, click on the vertical or the horizontal ruler, and drag towards the preview. To remove the guide, do the opposite.
Show points: See the Add Markers tool.
Show rulers: Shows or hide the rulers on the left and top of the preview.
Show deformation grid: If enabled, deformed cues will show the deformation grid in wireframe. If disabled, only the deformation points will be visible.
Snap to grid: when moving a cue, the cues’ borders will be magnetized to the 100x100x grid.
Snap to guides: same, but with the horizontal and vertical guides.
Snap to screens: same, but with the Media Servers’ output borders, including the different parts in Multi-output mode.
Snap to TextureAreas: same, but with TextureAreas’ borders.
Color filter: Shows only the red, green or blue component in the preview.
Detail level: The level of detail of decoded media in the 2D preview. This settings impacts only still images (png, …). By default, it is set to 1:8, so big images may appear blurry in the preview; this is done to improve performance. This setting is only valid in Producer: The Media Server will always show the media at full resolution.
Decoded media: Sets which media are decoded, and which display a placeholder icon instead. By default, only still images are decoded; movies, SDI & NDI streams, etc… are not shown. To view them in Producer, set this mode to “Decode all media”. The wireframe mode only draws a rectangle for each cue; this can be useful to save performance on Producer on big shows.
Sound: Enables/disables sound on Producer. By default, this is disabled, because sound is usually played on a specific Media Server on which Audio mode is enabled. See the Edit Media Servers section.
View presets: These presets record the current view of the preview, which can later be recalled. To save the current view, right-click on a preset button, and select “Set”. Clicking on the button will now teleport to this particular position of the stage.
Guides
Drag&dropping the rulers creates vertical or horizontal guides. Then, by double-clicking on them, their exact position can be configured.
Cues will now magnetize to these guides.
To remove a guide, drag&drop it back in the ruler.
Full reference
General shortcuts
- Pan view: Middle click & drag
- Pan view horizontally/vertically: Alt + Middle click & drag
- Zoom: Wheel
- Hand tool: H
- Pan: Left click & drag
- Position tool: V
- Select a cue from current Timeline/Board: Left click
- Rubber band cues selection from current Timeline/Board: Left click & drag
- Toggle cue selection from current Timeline/Board: Ctrl + Left click
- Move selected cues position horizontally/vertically: Alt + Left click & drag
- Scale selected cues: Shift + Left click & drag
- Move selected cues position:
- Move 1 px: Left/Right/Up/Down
- Move 10 px: Ctrl + Left/Right/Up/Down
- Move 0.2 px: Shift + Left/Right/Up/Down
- Rotation tool: R
- Rotate cue: Left click & drag
- Point marker tool: (No shortcut)
- Add a marker point: Left click
- Remove marker point: Left click & drag out of the scene
- Deformation tool: W
- Select a point: Left click
- Rubber band points selection: Left click & drag
- See "Deformers"
- Deformation UV tool: Shift + W
- Same shortcuts as Deformation tool
- Focus on selected cues: F
- Cancel Add texture: Escape
Deformers – points selection
- Select point: Left click
- Toggle point selection: Ctrl + Left click
- Select neighbor: Alt + Left/Right/Up/Down
- Add neighbor point to selection: Alt + Shift + Left/Right/Up/Down
- Select neighbor line: Ctrl + Alt + Left/Right/Up/Down
- Add neighbor line to selection: Ctrl + Alt + Shift + Left/Right/Up/Down
Deformers – points move
- Move selected points: Left click & drag
- Move selected points horizontally/vertically: Alt + Left click & drag
- Move 1 px: Left/Right/Up/Down
- Move 0.2 px: Shift + Left/Right/Up/Down
- Move 10 px: Ctrl + Left/Right/Up/Down