ActionGraphs
Introduction
ActionGraphs are Onlyview’s way to create new behaviours that are tailored to your show.
Using ActionGraphs, you can for instance:
Connect real-time tracking data to 3D objects that will follow what happens on stage
Trigger events when receiving network commands
Control other equipment
Create animations and other dynamic, reactive effects
Filter or delay noisy sensor data, implement custom mathematical functions
Creating an ActionGraph
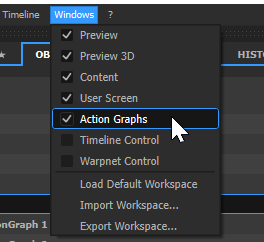
All new shows have a default, empty ActionGraph. The ActionGraph window is accessible from the top menu:
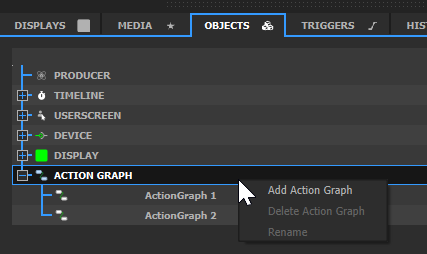
To create a new ActionGraph, go in the OBJECTS tab, and right-click on the ACTIONGRAPH item.
Events
For any node to run, it needs to be triggered by an event. There are a few basic events like “OnFrame”, which is triggered every frame, or “OnTime”, which is triggered at a certain hour
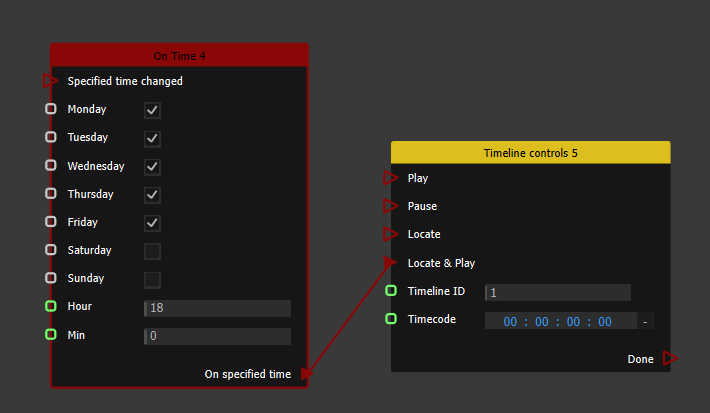
In this example, the OnTime event will trigger a Locate&Play on Timeline 1 every day at 6pm, except on week-ends.
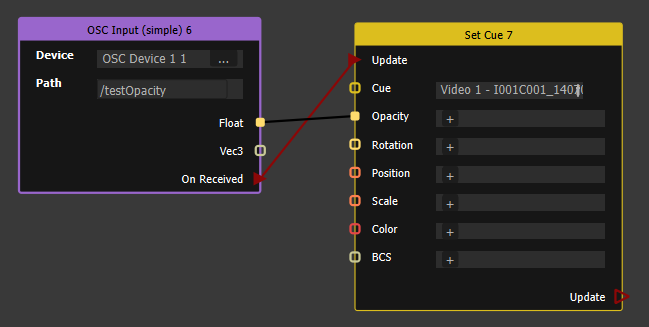
Some nodes can expose events too. For instance, we can control the opacity of a cue each time we receive an OSC value:
Events are always red. A node that is not connected to any event is shown in dark, to highlight the fact that it will never run:
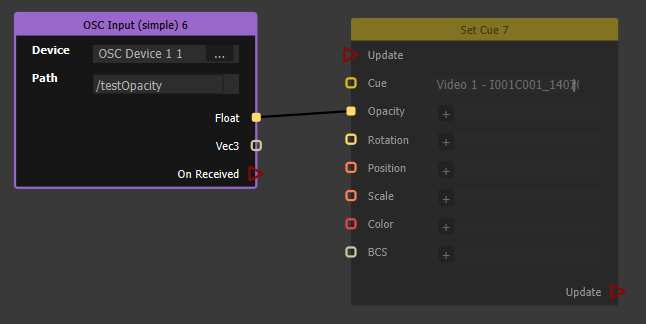
Here, we want to read the OSC value; but the “Update” event of the “Set Cue” node is never triggered, so nothing happens.
Data
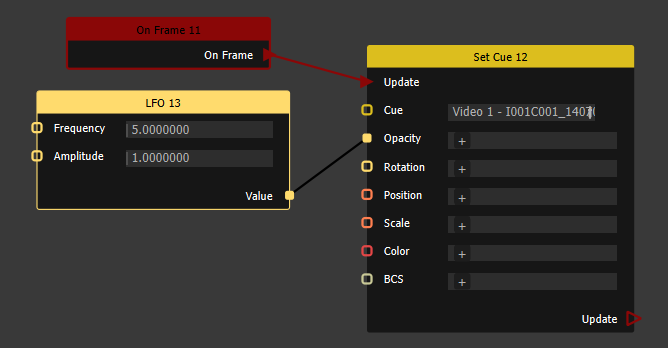
Nodes have input and output data. For instance, the LFO (Low Frequency Oscillator) node has a frequency and amplitude inputs, and outputs an oscillating signal:
The light yellow color indicates real numbers (“floats”). The cue’s position is orange, which is a 2D vector.
You can plug most outputs into most inputs, and Onlyview will automatically do the conversion. But sometimes it’s not possible and creating the connection will not be possible :
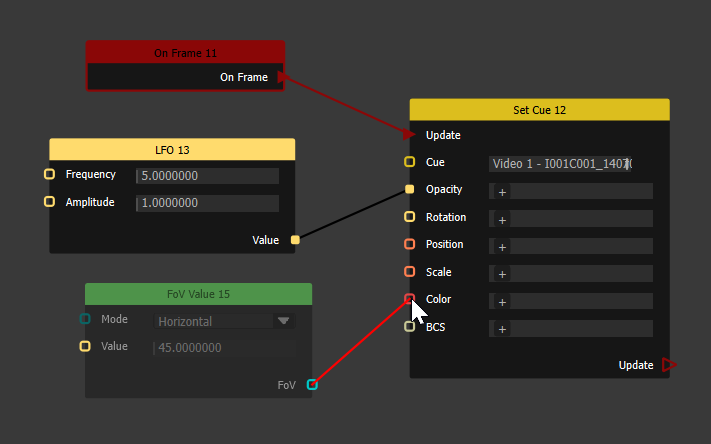
Attempting to plug a “Field of View” into a “Color” is not possible.
Common cases
To trigger a LocatePlay when receiving a specific UDP message:
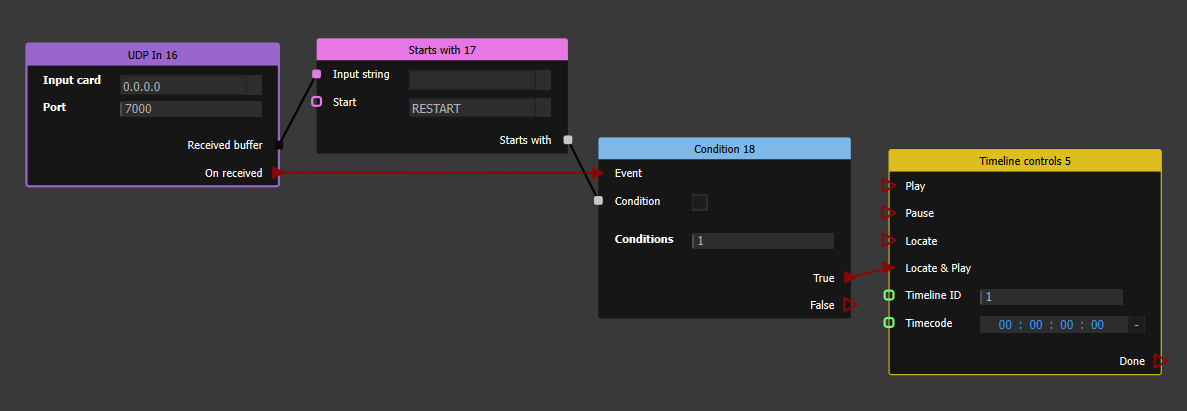
Here, we listen on all network cards (0.0.0.0), port 7000. When receiving a message, we test if it begins with the string “RESTART”; if so, timeline 1 starts playing from the start (timecode 00:00:00:00)
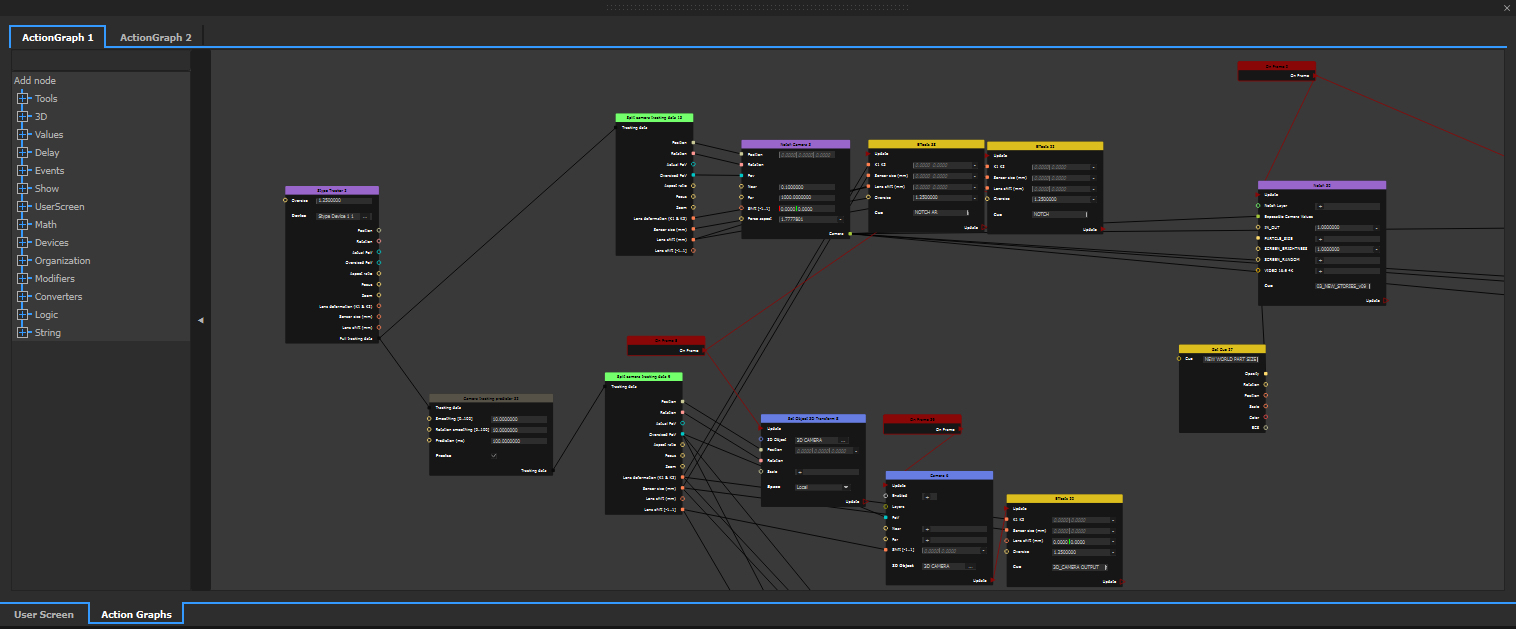
To track a camera using a Stype:
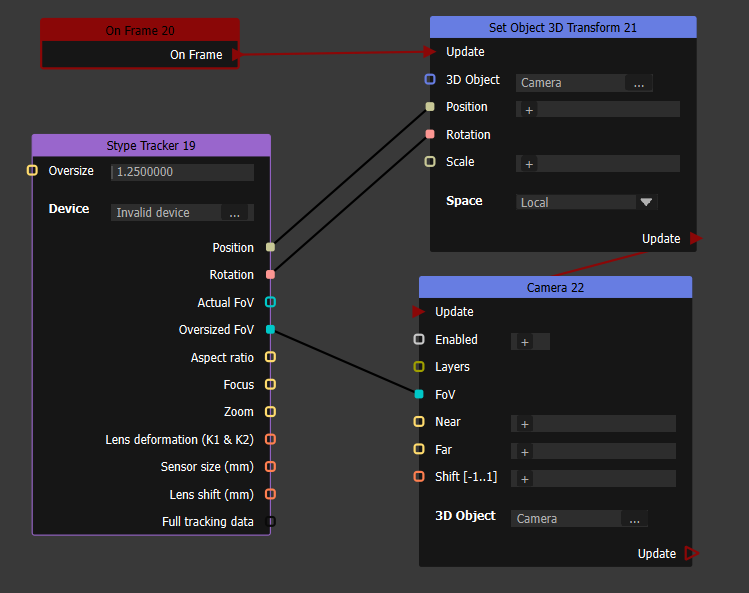
Each frame, we read the data from the Stype device, and feed:
The position and location in the Camera 3D object
The FoV (zoom) in the Camera component.
This simplified setup does not include the lens shift and the lens deformation.
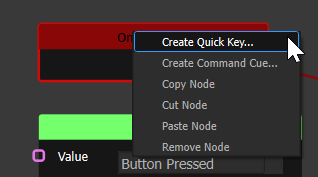
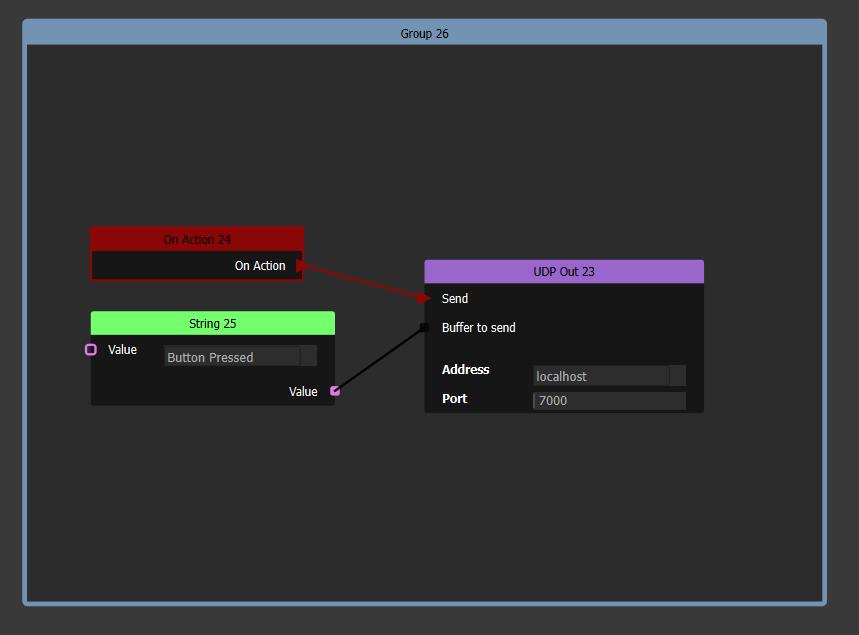
To send an UDP packet when pressing on a QuickKey:
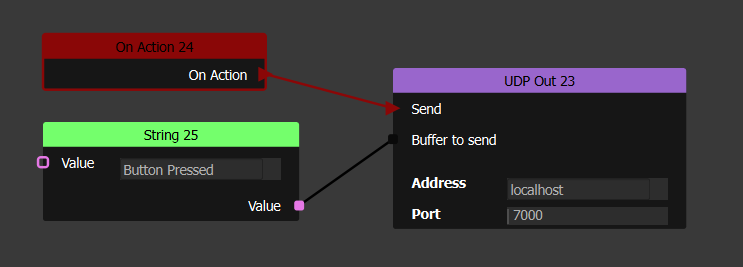
Then right-click on the OnAction, and create a QuickKey to trigger this node:
Nodes reference
Values
String, Float, Integer, FoV, 2D Vector, 3D Vector, Timecode, Boolean : For entering a value manually, and potentially re-use it at multiple places.
Split 3D Vector / Split camera tracking data: “3D vector” and “camera tracking data” are structures that contain multiple fields. These nodes can access the underlying data. Note that you can also split a 2D Vector using the Split 3D Vector node.
Make camera tracking data: This is the opposite to “split”, it allows to compose a single value from multiple sources.
Set Value / Get Value : Stores values; like variables in programming languages.
Value selector: chooses between several input values, depending on an index.
Tools
Viewer: For debugging your ActionGraph and seeing intermediate values.
3D
All these nodes are related to the 3D engine.
Set Object 3D Enabled: Enables/Disables a 3D object. All the components of the object and of all its children will be disabled. So meshes will not be rendered, cameras will not output anything, etc.
3D Object: Accesses all the properties of a 3D object
Decal: Sets all the properties of the Decal component of a 3D object
Set/GetObject3DTransform: gets or sets the position, rotation and scale of an object; either in local or world space.
Camera: Sets all the properties of the Camera component of a 3D object
Compute Pivot: Computes a pivot transform from its child local and world coords. Tracking devices, like Stype, give tracking data relative to their own, local origin.But we need to be able to calibrate where this origin is, in world space. In other words, we need to *precisely* find where the Stype crane is.
One way to do that is to create a fake projector component, and calibrate it using the manual calibration tool. So, we can have the Stype camera position, in world space. Since we also have the camera position in local space (given from Stype), computing the location of the Stype origin is a simple math operation.
This controller takes the following objects:
- The calibrated camera. Its world-space position is correct (=calibrated manually).
- The tracked camera. Its local-space position is correct (=given by Stype)
- The Stype origin. This is what we want, it will be modified.
Beware, the camera calibration can't track a moving object (otherwise we wouldn't need Stype) ! So this controller must be executed only once, before moving the camera again. It is typically connected to a OnClick node.
Values
These nodes make it possible to re-use a value at multiple places: you can usually enter a value directly in a node’s inspector; but if you want to use the same value in multiple nodes, you can create a Value node, and connect its output in multiple places.
String Value, Float Value, Integer Value, FoV Value, 2D Vector Value, Timecode Value, 3D Vector Value, Boolean Value: creates a single value of the desired type
Split camera tracking data, Make camera tracking data: The Camera Tracking Data value is complex, and composed of many fields. These two nodes can construct a Camera Tracking Data, or split it. This is useful to add filter, for instance: split the incoming data, add custom filtering on the position (for instance), then re-merge the data.
Set Value, Get Value: Creates named variables. Create a variable with a given name and value; then you can re-use it later, or in a separate ActionGraph.
Value selector: Selects between multiple values, depending on an input index. For instance, if you have 4 trackers, you can feed them all to the Value selector; and depending on “Index”, your 3D object will follow any of the 4 trackers.
Split 3D Vector: Splits a vector in its 3 floats.
Delay
Delays the input value by a fixed number of frames.
Events
OnTime: Triggered at a specific day, on a specific time. It you have a different time for each day, you can add 7 OnTime, one for each day.
OnClick: Adds a button in the ActionGraph. Mostly useful for debugging.
OnAction: Triggered by a QuickKey or a CommandCue. Right-click on it to create the QuickKey or the CommandCue.
OnFrame: Triggered every frame.
Show
A Show is organized in Timelines; which are organized in Layer; which contain Cues. These nodes can access this hierarchy.
Layer: Turns a layer on or off (“blind”)
Get/Set Cue: Accesses the main properties (opacity, position…) of a specific
Get/Set Timeline: Accesses the main properties (On/Off, grandmaster, timecode) of a specific timeline
Get/Set Board: Accesses the main properties (On/Off, grandmaster, sequence, timecode) of a specific board
Timeline Controls: Triggers play/pause/locate events on a timeline
Board Controls: Triggers play/pause/locate events on a board
Display Info: tells if the ActionGraph is currently running on Producer or one of the Displays; and if so, which one.
Effects: Sets the parameters of the cue’s Effect. Effects are accessible by Ctrl+Double-click on a cue; this opens the expanded cue editors, and allows to select the effect.
Log text: Writes text in Producer’s LOG tab. Useful for debugging and troubleshooting.
UserScreen
These nodes read or set the values of most widgets that you can add in the UserScreen.
In particular, user-interactible widgets like “Slider” provide an “on changed” event, which you can monitor.
To select which widget to get/set, drag&drop the picking tool (in the inspector) on the desired UserScreen widget.
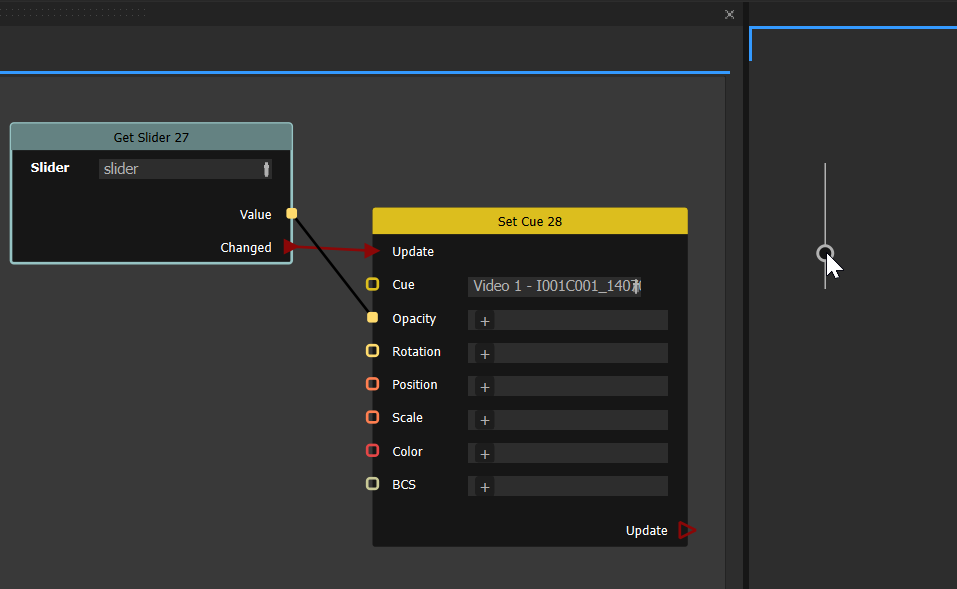
In this example, the value of the slider is connected to the opacity of a cue.
Math
Clamp Float: Limits the input between a min and a max
Float Operation: Adds/substracts/… two numbers
Int Get Bits: Select bits from an integer value. Helps with bitfields.
LFO: Low Frequency Oscillator, oscillates smoothly between -1 and 1 with time, at a given frequency.
Map Range Float: Linearly maps an input rage to an output range. For instance, if a device sends you a value between 0 and 1 (fully closed/ fully opened), you can map that to a -90°…+90° rotation.
Vector 2D Distance: distance between 2 points
Vector 2D Operation: Adds/substracts/… two vectors
Vector 2D Dot: 2D dot product (how similar are the direction of two vectors)
Vector 3D Distance: distance between 2 points
Vector 3D Operation: Adds/substracts/… two vectors
Vector 3D Dot: 3D dot product (how similar are the direction of two vectors)
Quaternion mix: interpolates between 2 rotations. When Mix factor is 0, it will output Value A; when it is 1, it will output Value B; and when it is 0.5, a mix of A and B. The mix factor can also be outside [0,1], in which case it extrapolates.
Quaternion-float multiplication multiplies a rotation by N.
Quaternion multiplication: combines 2 rotations. Rotation A is applied, then rotation B is applied on top.
Quaternion inverse: Inverse of a rotation.
Seed: Gives a random seed to apply to random nodes.
Shuffler: Shuffles a range of integers. Mainly used to play random Board sequences.
Devices
Not all devices expose ActionGraph nodes; it’s mostly devices related to 3D tracking that are accessible from the ActionGraph.
Notch
Notch: Sets the exposed parameters of a Notch cue.
Notch Null, Notch Camera: A Null is an exposed parameter with a position and a rotation. A Camera also contain lens data.
HTTP
Http send: send HTTP requests to remote servers
Http receive: Acts as an HTTP server. Waits for requests from remote HTTP clients.
Network
UDP In, UDP Out: Receives/sends UDP packets directly in the ActionGraph, without any additional Device. You need to do your own processing, for instance using “String Contains” and “Section”.
Blender
Blender Tracker: Receives tracking data from Onlyview’s Blender plugin
OSC
OSC Output: sends OSC data
OSC Input (simple): Receives simple messages with either a single float, or exactly 3 floats.
OSC Input (full): Receives any OSC message. Enter the expected path, then click “Update outputs”. The node will update with the data contained in the message. Note that the OSC protocol does not contain the names of the fields; so Onlyview can’t give meaningful names to the slots.
Art-Net
Art-Net: Gets the last received value on a specific Universe+Channel. Note that the ArtNet device directly supports triggering QuickKeys.
BlackTrax
BlackTrax: Receives BlackTrax tracking data
FreeD
FreeD: Receives FreeD tracker data. Also, the lens characteristics (shift, deformation…) are edited directly in the node.
IpCoder
IpCoder: Receives the linear activation of the coding wheel
Unreal Engine
Unreal value output/camera output / object output: Sends values to Onlyview’s Unreal plugin, which must be installed and compiled in the Unreal Engine project.
LPM
LPM: Receives LPM tracking data
OptiTrack
OptiTrack: Receives OptiTrack tracking data
Stype
Stype Tracker: Receives Stype tracking data
Organization
Group: Groups together several nodes as a single logical unit, for more clarity. In particular, moving the group moves all the nodes inside. The group can be renamed.
Comment: Simple text box for explaining the behaviour of the ActionGraph
Logic
Float Comparison: Compares the 2 inputs with a specific criterion (less or equal, …)
Int Comparison: Same, but for integer numbers
Condition: Fires one of the output events depending on the various input conditions.
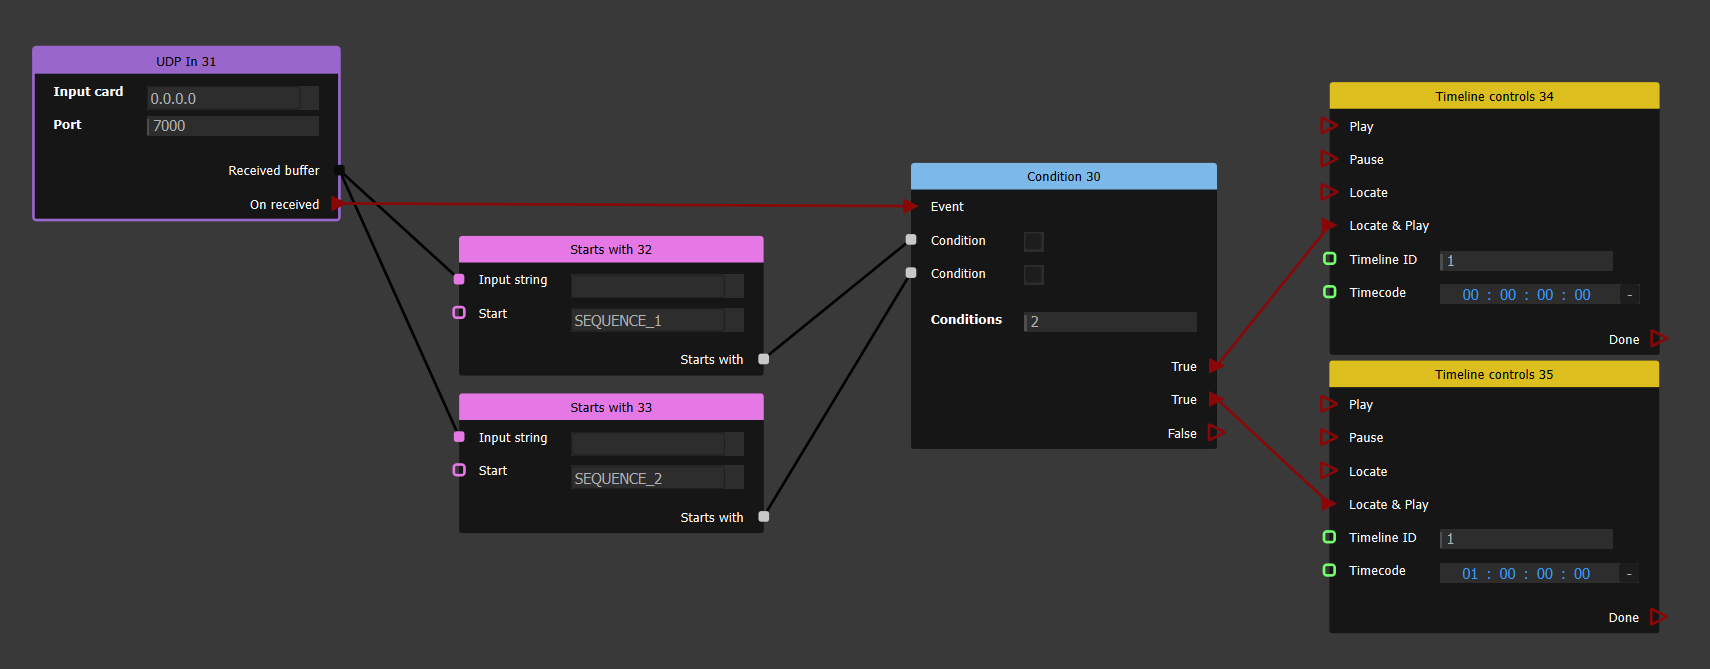
For instance, here we fire either the 1rst or 2nd event depending on wether the received buffer starts with “SEQUENCE_1” or “SEQUENCE_2”.
String
StartsWith: Return true if the input string starts with the given string
Section: Returns a part of the input string: from the “start” character, and up to “count” characters.
Concatenation: Returns a bigger string composed of the two inputs side-to-side
JSon
Parse JSon: Takes text as an input (often from an HTTP receive node), and returns a JSon node. You can’t use the JSon data directly, you need a Get Child By Name node to find the data that interests you.
Get Child By Name: Finds subdata in a JSon object. You may need to have multiple nodes, one to access each layer of hierarchy in your JSon document. For instance, this graph logs the content of tag/lang.
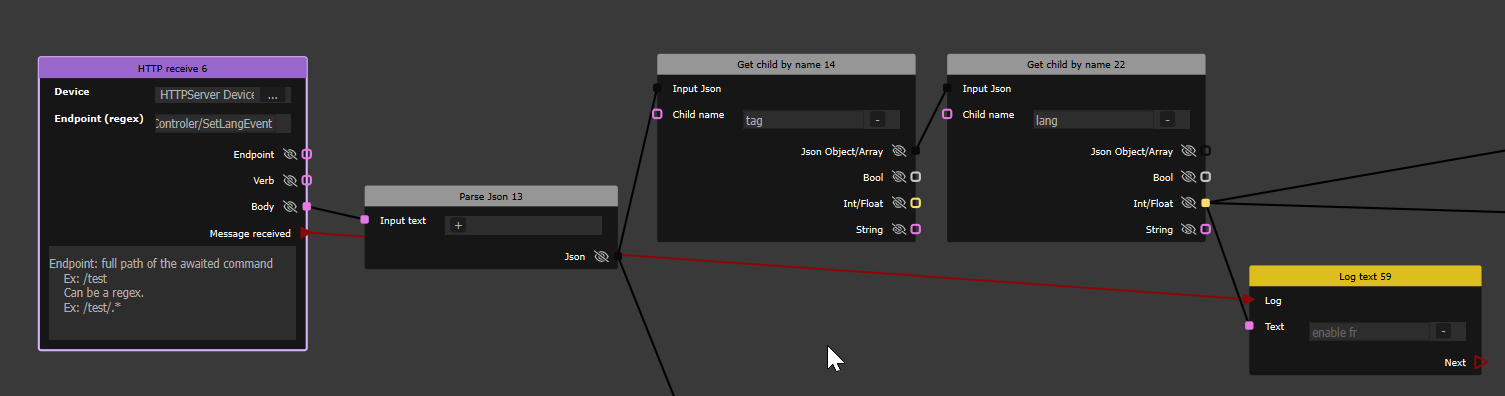
So, given the following JSon:
{
"tag": {
"lang": 1
}
}
, it will print 1.
Full reference
Keyboard shortcuts
- Pan: Middle click
- Select a node: Left click
- Toggle node selection: Ctrl + Left click
- Rubber band: Left click & drag
- Add rubber band selection: Ctrl + Left click & drag
- Copy nodes: Ctrl + C
- Cut nodes: Ctrl + X
- Paste nodes: Ctrl + V
- Remove nodes: Delete
- Focus on selected nodes: F