Configuring
Configuring the Media Servers
Overview
The Edit Media Server dialog is used to connect new Media Servers to the shows and edit them.

Adding a Media Server
The connected Media Servers will automatically appear in the list. To add one in your show, click on the "+" next to it.
The MAC address will be auto-completed on the next Ctrl-O.
Alternatively, click on Add Screen, and enter the Media Server's IP address.
Configuring a simple Media Server
By default, a Media Server is configured to output a single FullHD stream.
This can be edited in the Graphic Card Resolution section.
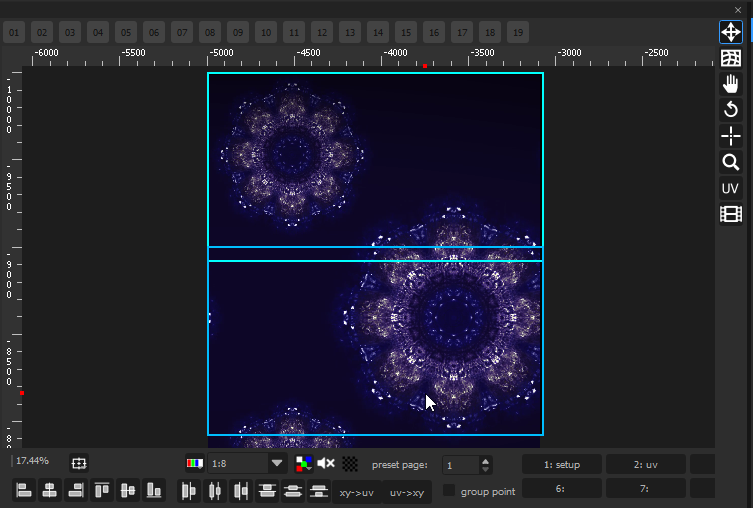
The Stage section delimits which part of the stage this particular Media Server will show.
Usually, different Media Servers will show different parts of the stage. In this simple example, there is one Media Server for the top of the media, and one Media Server for the bottom. They overlap on the middle to allow for a smooth transition between the projectors (softedge).
Configuring a Media Server with specific output types
In addition to basic HDMI/DisplayPort video output, you can create other types of outputs:
- SDI
- NDI
- Spout
- SMPTE 2110
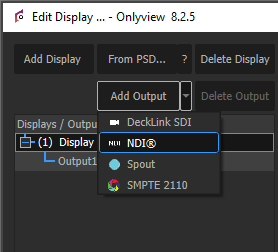
A Media Server requires at least one basic output in order to work. Synchronization between different type of outputs is not guaranteed.
Media Server tab full reference
Name: A representative name for the Media Server.
MachineID : Corresponds to your license; printed on each case.
IP: The IPv4 address of the Media Server. It is automatically filled during the Ctrl-O.
Mac Address: Used for Wake-On-LAN. It is automatically filled during the Ctrl-O.
Clone Mode & Clone ID: When using Clone Mode, the current Media Server will ignore all its settings, and use the ones from the Clone Media Server ID instead. A single Media Server can be cloned multiple times. This is usually done to overlay multiple projectors to increase luminance. Note, however, that this forces to do keystone adjustments directly on the projector, since the deformation will be shared between all clones; to avoid this, you can use a real Media Server instead, and import the deformation from the original Media Server.
Type: A Media Server can play Video, Audio, and Pixel Mapping (via Art-Net). By default, only Video is enabled. Ticking «Pixel Mapping» enables the related tab.
Version: This field shows the version of display.exe that is running on the remote computer. It must match the version of Producer, otherwise a warning is shown. A Ctrl-O is needed to update this field.
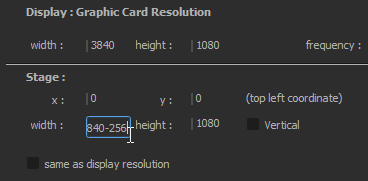
Graphic card resolution
Width, height, frequency: The resolution & frequency of the projector that is attached to the Media Server. If you have multiple projectors connected to a single Media Server, you need to create several Outputs for this Media Server.
Force resolution: When checked (the default), Media Server will switch to the user-provided resolution. If not checked, it will remain in whatever resolution it previously was.
Stage
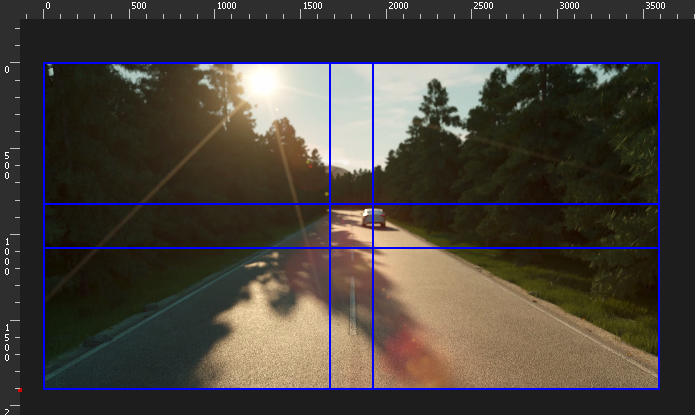
Stage x, y, width, height: This delimits the zone of the stage this particular Media Server will show.
Same as display resolution: By default, a 1920×1080 Media Server will capture a 1920×1080 zone of the stage -- and the position of this zone is set using Stage X and Stage Y. But this zone can also be bigger or smaller. If the ratio is not kept, the output image will be stretched, which may be desirable.
Back color: The background color of the Media Server, i.e. the color when no cue is shown on top. Black by default.
Softedge
When multiple Media Servers overlap on the Stage, a softedge will automatically be computed by Onlyview so that the two projectors blend perfectly. This feature is enabled in Display Setup -> General -> Enable Softedge.
For a variety of reasons, this feature may not be sufficient:
-
You need to finetune the automatic 2D softedge
-
You organized the Media Servers so that they do not overlap on the Stage to ease compositing
Softedge may then need to be customized.
Length: In pixels, how high/wide the softedge will be. As a rule of thumb, you should arrange your projectors to allow for approximately 15% softedge.
Gamma: Projectors usually output in sRGB. This means that the hardware internally applies a gamma of roughly 2.2 to the pixel colors given by Onlyview. This must be taken into account when doing the transition from one projector to another, so that visually, the luminance remains constant, and the "seam" as invisible as possible.
With and without gamma correction:

Offset: Helps finetuning the gamma curve. 1 means no offset. 1.1 means that the end 10% of the softedge will be fully black. In other words, the softedge will only use 90% of the available pixels.
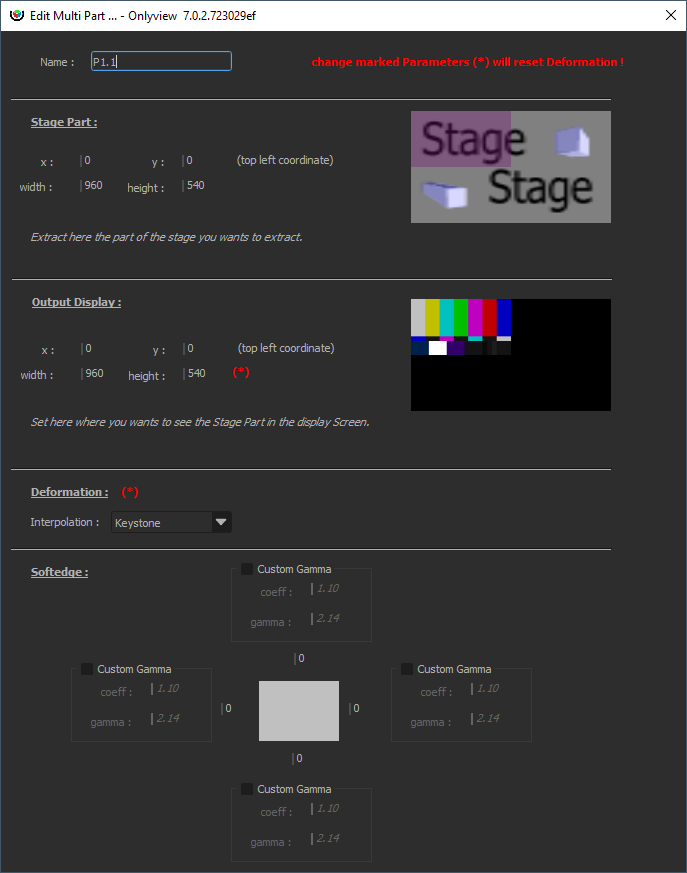
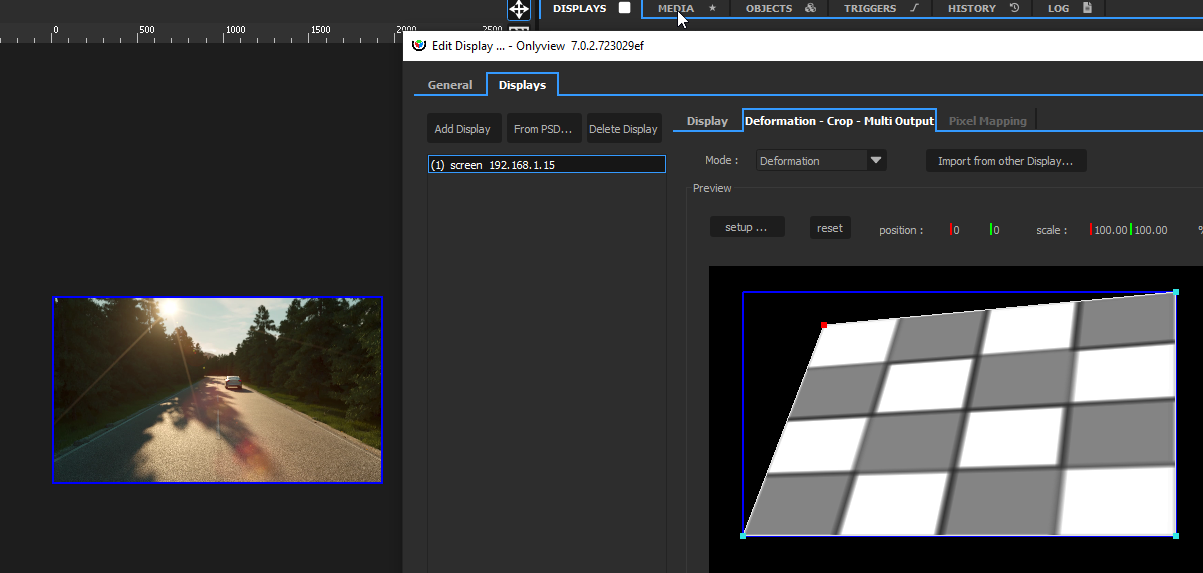
Deformation & Multi-Output tab
Overview
In the Deformation tab, you can do simple deformations to your output feed.
By default, new screens are in Simple mode - that is, no deformation can be applied. This mode is slightly better for performance.
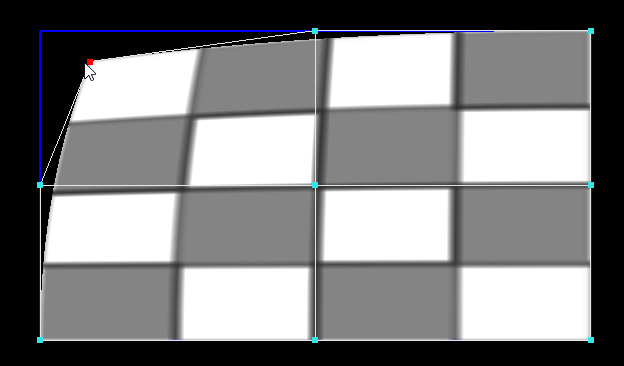
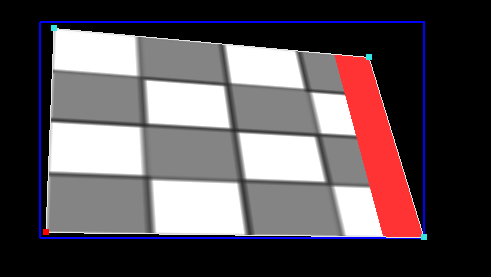
In Deformation mode, you can deform the screen using either a Keystone deformer, or a Curve deformer.
- Keystone deforms the whole screen using only the four corners, while maintaining a correct perspective deformation.
- Curve offers more control.
The Multi-Output mode renders multiple views in a single feed. See the related section below.

Each part can then be deformed individually.
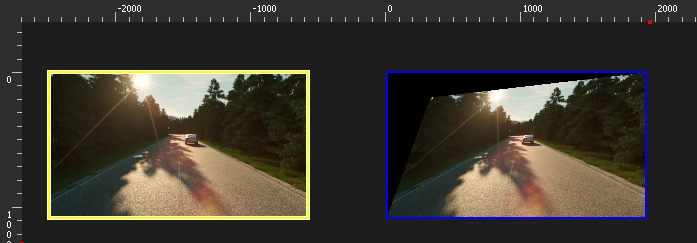
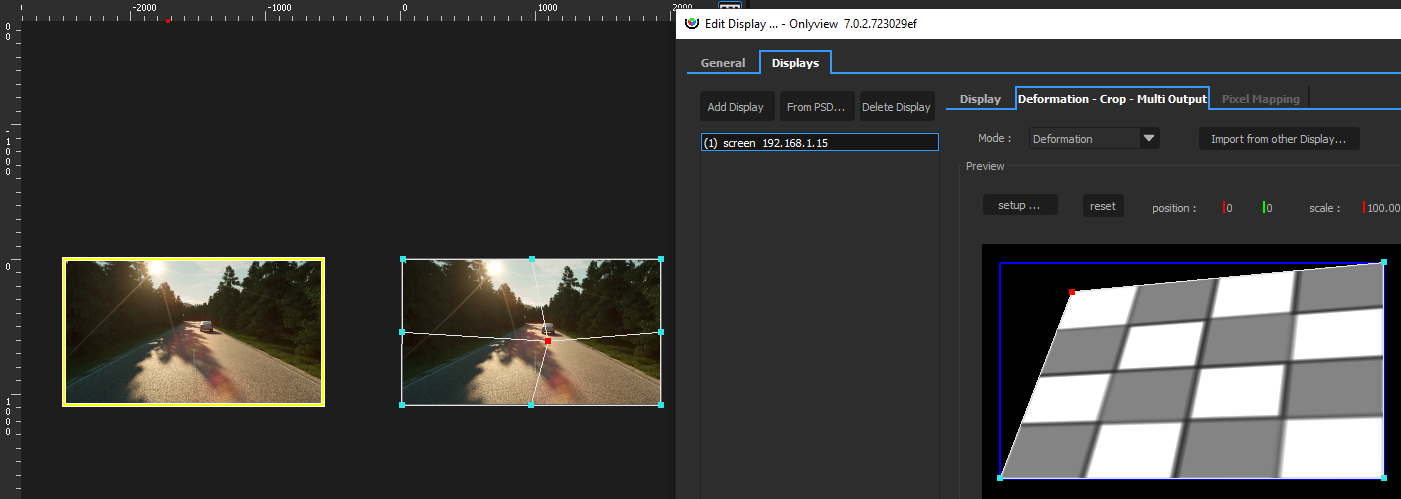
Crop
The output can be cropped on all sides. Cropping is impacted by the deformations:
Simple
Simple mode does not do any deformation. This is the default mode, because it is slightly better for memory and performance.
Deformation
This mode deforms the whole screen. The memory and performance hits are similar to using an extra TextureArea.
Multi-outputs
This mode makes it possible to deform several parts of the screen individually. It is most commonly used in conjunction with NVIDIA Surround or Mosaic. Multiple projectors are arranged on a single extended desktop. OnlyView just sees a single big screen (for instance, 4*4K). The multi-output feature can then be used to assign a different zone to each 4K part of the extended desktop. This feature makes it possible to have good synchronization with non-professional GPUs; However, it is recommended to use Quadro cards instead.
Example:
We have 1 Media Server with 2 FullHD projectors, arranged horizontally. We want a 256px overlap for the softedge. So, we have a 2×1920=3840px wide screen, but our media must be 256px narrower, so 3840-256=3584px.
In the Multi-output tab, click "Wizard", and input 2 horizontal parts, with a 256px overlap.
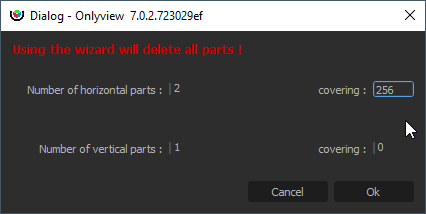
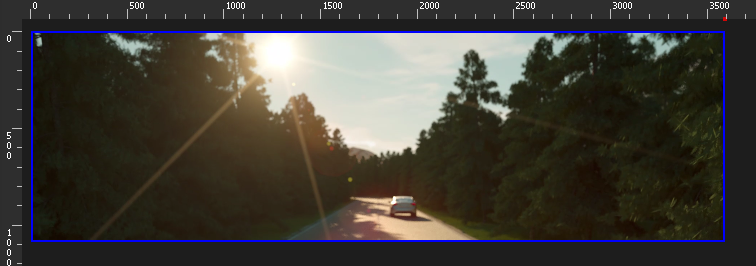
This will generate 2 parts, with the correct overlap, and the correct softedges. On the 2D stage, the Media Server will appear to take 3584px.
The middle part will be rendered twice, once for the left projector, once for the right projector.

Other ways to deform the output
Note that there are other means to deform the output:
- In this first example, the media is placed directly on the Media Server, and the Media Server is then deformed. This is the simplest setup.
- You can output your media in a TextureArea zone, then show this TextureArea in the Media Server\'s zone, and deform it
- You can combine both (do the main keystone in the Deformation tab, then fine-tune by going through a TextureArea)
- When using a 3D scene, the deformation will be handled by the 3D mesh. But fine-tuning is usually needed; it can also be done either in the Deformation tab, or by going through a TextureArea.
EDID Settings
EDID (Extended Display Identification Data) management allows you to configure your GPU outputs in advance, without having the actual monitors connected. This is particularly useful for pre-show setup, testing, and maintenance scenarios where you need to prepare Media Server configurations before the actual hardware is available.
Overview
The EDID Settings dialog is accessed from the Media Server configuration window and provides tools to manage display identification data on professional GPUs. This feature requires professional graphics cards (Quadro, Tesla) and is only available on Windows systems.
Understanding EDID
EDID contains information about a display device including: - Manufacturer and model information - Supported resolutions and refresh rates - Color capabilities and gamma characteristics - Physical dimensions and orientation
When a monitor is connected, the GPU reads this information to determine optimal display settings. By "locking" an EDID, you can preserve these settings even when the physical monitor is disconnected.
EDID Operations
- Lock EDID: Captures the EDID from a currently connected monitor and stores it on the graphics card. This allows the monitor to be disconnected while maintaining the same display configuration. The GPU will continue to behave as if the monitor is still connected.
- Export EDID: Saves the EDID data from a connected monitor to a file (.txt or .bin format). This is useful for backing up monitor configurations or sharing them between different systems.
- Load EDID: Applies a previously saved EDID file to selected GPU connectors. This allows you to configure outputs with known-good monitor settings even when those specific monitors aren't connected.
- Unload EDID: Removes any custom EDID override and reverts to using the EDID from the physically connected monitor (or no output if no monitor is connected).
DisplayPort Dual-Mode
DisplayPort connectors can operate in two modes: - DisplayPort mode: Used with native DisplayPort monitors or active adapters - Dual-Mode (DP++): Used with passive HDMI adapters, where the GPU outputs HDMI signals over the DisplayPort connector
When configuring disconnected outputs, you need to specify which mode to use via checkboxes in the EDID Settings dialog. If in doubt, connect the actual hardware first to see which mode is automatically detected.
Usage Requirements
- NVIDIA Quadro GPUs are required (consumer GPUs don't support EDID override)
- Windows only
- Administrative privileges (automatically handled via the elevated helper service)
- Connected monitor for Lock and Export operations
Typical Workflow
- Connect your target monitor to the Media Server
- Open the Edit Media Server dialog and click "EDID Settings"
- Select the connector in the tree view
- Click "Lock" to capture and override the EDID
- The monitor can now be disconnected while maintaining the same output configuration
- Use "Export" to save the EDID for future use on other systems
- Use "Unload" when you want to revert to physical monitor detection
Status Indicators
In the EDID Settings dialog, connectors show their current status:
- Connected - Monitor: Using EDID from the physical monitor
- Connected - File: Using a locked or loaded EDID override
- Disconnected: No monitor connected
- Error: Connected but unable to apply EDID
General tab
This tab handles settings that are common to all Media Servers.
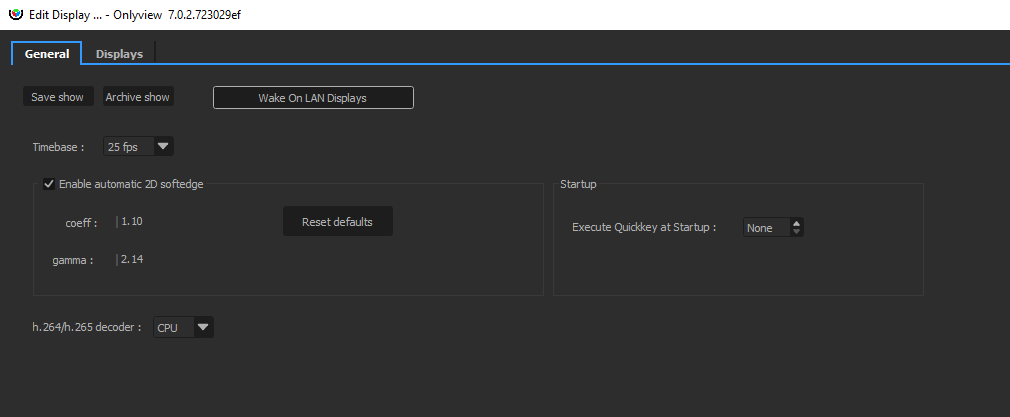
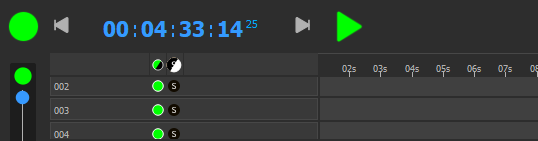
The most important one is the timebase, which dictates how timecodes will be interpreted across the whole show: setting 25fps here will, in particular, impact the timelines:
Enable automatic 2D softedge: When multiple Media Servers overlap on the Stage, a softedge will automatically be computed by Onlyview so that the projectors blend perfectly. For instance, in the following show, there are 4 FullHD Media Servers, with a 256px overlap:
Using this option, the top-left Media Server automatically shows the media with the softedge applied.

The gamma and offset parameters are global parameters that apply to all Media Servers, and that can be finetuned per-Media Server using the Custom Softedge parameters, available in the Media Server tab.