Effects & Cue View
Effects & Cue view
Ctrl+double-clicking (or right-click -> Edit all cue parameters) on a cue gives access to the Cue view: a panel on which all the animatable cue parameters can be edited, including the ones not exposed in the quick parameters. In particular, it shows the Effects options.
The Cue view is the same panel whether the cue lives on a Timeline or on a Board.
To exit the cue view, close it in the top-right corner, or ctrl-double click on an empty area of the container.
While the cue view is active, some actions are locked, like deleting the cue.
Deformation
On top of position, scale and rotation, a cue can be freely warped using a grid of control points. This is the same deformation tool used on Media Server outputs, but applied to an individual cue.
To enable deformation on a cue, select it, press F8, click "Setup" on the left of the timeline, and validate. The Setup dialog lets you choose the number of columns and rows of the control grid, and the deformation mode:
-
Bézier patch (the default): the grid is made of Bézier patches, so each point has tangents for smooth, curved deformations. The tangents can be Linked, Unlinked, or set to Linear -- the last one approximates a keystone using only the four corners, which is faster to edit.
-
Linear: straight lines between points. Lighter, with no curvature.
-
B-Spline: the grid points act as a smooth spline.
A higher grid quality subdivides each patch further, for a smoother result at a small performance cost.
Once deformation is enabled, the points are edited in the 2D preview, with the Deform tool (W) for the shape and the UV tool (Shift-W) for the texture coordinates. Deformation points can be animated like any other parameter. See the 2D preview chapter for the full list of editing shortcuts.
[SCREENSHOT: the deformation Setup dialog and a deformed cue]
Effects
Each cue can have one effect, a shader applied to the media before it is composited. The effect is chosen from a dropdown in the cue view; selecting one reveals its own parameters just below, and those parameters can be animated like any other.
The available effects are:
-
Keying & alpha -- Lumakey (make pixels transparent by luminance), Chroma Key (make a chosen color transparent), Ignore alpha (force the media fully opaque), Alpha un-premultiply (fix premultiplied media), Alpha2Gray (show the alpha channel as grayscale).
-
Color -- Sharpness (with brightness/contrast), Blur (separate horizontal and vertical amounts), Levels (per-channel input/output levels and gamma), Color Mix (rebuild each output channel from a mix of the input R/G/B), Sepia toning, Noise HSV (animated noise).
-
Stylize & distort -- Pixel (pixelation), Dither, Hatch Line, Twist, Wave, Double Vision, V/H Color Stripe, Lens deformer (radial lens distortion from K1/K2, sensor size and lens shift).
-
Masking & edges -- Rounded Mask (an elliptical mask with size, position, softness and invert) and Soft border (feathered borders, adjustable per side).
-
Utility -- Ignore automatic color space conversion, for the rare cases where the built-in color-space handling must be bypassed.
For shape-based masking with animated curves, use Vector Masks instead (see the dedicated section).
[SCREENSHOT: the Effects dropdown and a selected effect's parameters]
Compositing & blend modes
By default, a cue is drawn normally over whatever is already on the stage (the cues on the layers below it, and the containers drawn before it). The blend mode changes how the cue's pixels are combined with what is underneath -- the same idea as blend/fusion modes in image editors.
The blend mode is selected in the cue view. In addition to Normal, the available modes are the usual compositing set: Darken, Lighten, Multiply, Screen, Overlay, Hard Light, Soft Light, Difference, Exclusion, Color Dodge, Color Burn, Linear Burn, Linear Dodge, Vivid Light, Linear Light, Pin Light, Hard Mix, Additive, Minimum, Maximum, Burn, and the component modes Hue, Saturation, Color and Luminosity. Two extra modes are exposed for specific workflows: Normal (inverse alpha), useful for content whose alpha is inverted (for instance some Unreal/Spout feeds), and Premultiply.
A cue can also act as a mask for the cues below it, using its luminance or its alpha channel as the mask. This is separate from Vector Masks, which mask a single cue with drawn shapes.
[SCREENSHOT: a cue with a non-normal blend mode over another cue]
Color correction
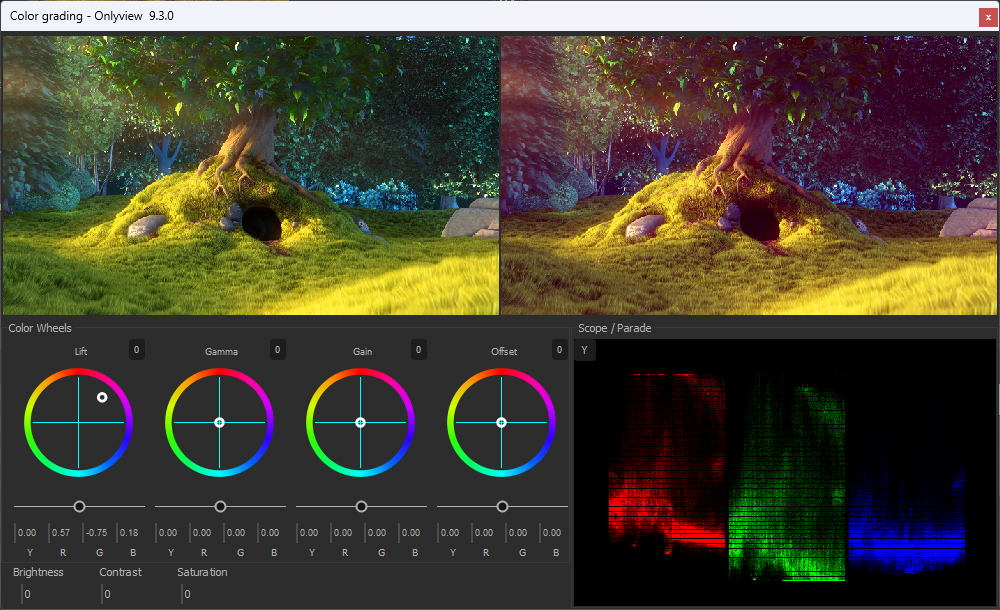
Cues have a built-in color grading, comparable to a DaVinci-style corrector. It combines two things:
-
Brightness / Contrast / Saturation (BCS): quick global adjustments, also reachable from the F7 quick parameter.
-
Color grading: per-channel (R/G/B) offset, lift, gamma and gain, acting respectively on the whole signal, the shadows, the midtones and the highlights.
These are edited in a dedicated, floating Color Grading editor, opened from a button in the cue view. The editor is non-modal and updates the image in real time as you drag the values. It shows Y/R/G/B histograms (a parade) of the current frame, together with a before/after preview, so corrections can be judged precisely.