CountDown
Overview
The CountDown device is a timer that belongs to the show rather than to a timeline. It counts down to zero (or up to a target), and it can be started, paused, extended and reset at any moment — by hand from a UserScreen, from a Command Cue or QuickKey, or from an ActionGraph. Typical uses are a "doors in 15 minutes" clock for the crew, a break timer, or a stage countdown that the operator can stretch live.
The device does not talk to any hardware. Its value is kept in step on every machine of the show, so the same timer can be shown at once on the Producer, on a UserScreen, on a WebPanel and on screen through a Countdown media.
Setup
Add the device from the Content dock → OBJECTS tab. The CountDown device has no setup dialog: the only thing to fill in is its name, which identifies it in action editors, in the device picker, and on the device widget.
Everything else — direction, duration, blink threshold, QuickKey — is set at run time, either by the actions below or from the widget.
Actions
Drop the device on a Command Layer of a timeline to create a Command Cue, or attach it to a QuickKey. Double-click the cue to choose the Action :
- Count/CountDown: Applies the timings below and immediately starts counting from the beginning.
- Set: Applies the same timings without starting or stopping the timer. If it is running, the finish time simply shifts by the difference in duration; if it is paused, the remaining time is adjusted. Use it to change the duration of a countdown that is already on air.
- Pause: Freezes the timer at its current value.
- Play: Resumes from where it was paused, or starts it if it has never been started.
- Add time: Adds time to the current countdown, whether it is running or paused.
- Reset: Stops the timer and puts it back at its start value.
Count/CountDown and Set share the same parameters:
- Start Time : and Target Time :: The two ends of the count, as timecodes. The direction follows from their order:
Start Timegreater thanTarget Timecounts down (e.g. 10:00 → 00:00),Start Timesmaller thanTarget Timecounts up (e.g. 00:00 → 10:00). - Start Blink At ...: Tick the box and give a timecode to make the display alternate between green and red once the counter passes that value — for example 01:00 to make the last minute flash. Left unticked, the display stays green.
- Launch Quickkey :: The number of a QuickKey to fire when the counter reaches the target. Leave it on None for no QuickKey. It fires once only, on the first crossing.
- Stop at end: When ticked (the default), the counter freezes on the target value. When unticked, it keeps running past the target — a countdown then continues into negative figures, which is useful to show how far over time you are.
Add time has a single parameter:
- Time offset: The amount of time to add, as a timecode.
Info
The Add time action can only add time — negative offsets cannot be typed into a Command Cue. To take time away, use the - button on the device widget, or send a Set action with a shorter duration.
Device Widget
The device can be dropped on a UserScreen: unlock the UserScreen, drag the device from the Content dock onto it, then lock it again. Its font, text colour and background colour can be changed in the UserScreen property editor.
The widget shows, from top to bottom:
- A title bar reading
[CountDown]followed by the device name. - A large green counter with the current value. It turns red and green alternately while blinking, if a blink threshold has been set.
- A line of information text: the name of the Command Cue or QuickKey that last ran a Count/CountDown or Set action on the device. Naming that cue after what the timer is counting towards is a convenient way of labelling the widget.
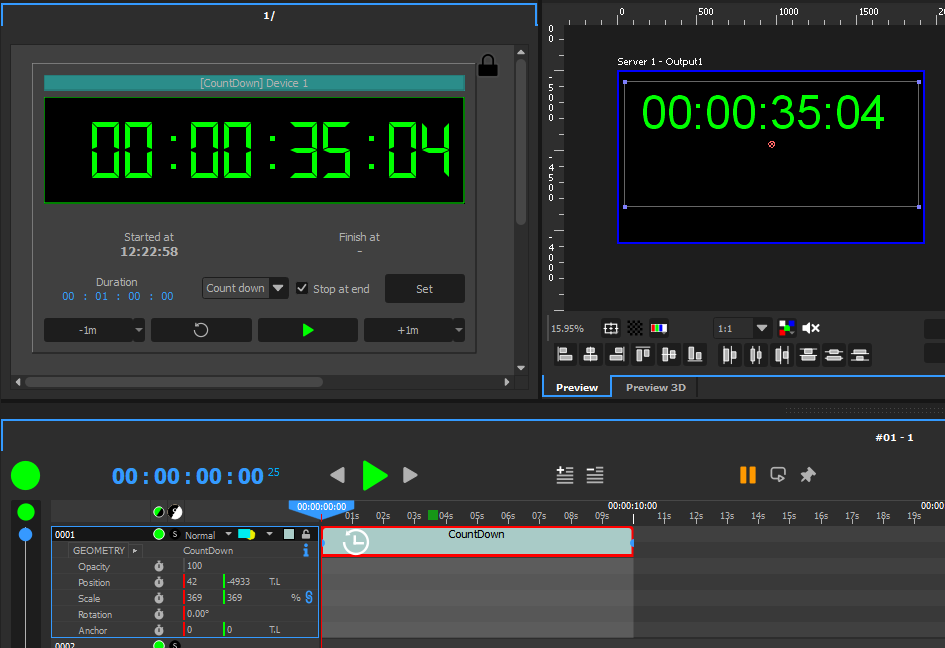
- Started at and Finish at: the wall-clock times at which the countdown was started and at which it will reach its target. They show
-while the timer has never been started, and Finish at shows-while it is paused. These take pauses and added time into account, so Finish at always reflects the real end time. - Duration, a Count down / Count up selector and a Stop at end tick box, followed by a Set button. Change the values then click Set to apply them — this is the same thing as the Set action, and it does not start the timer.
- A row of transport buttons: -1m, a reset button, a play/pause button, and +1m. The two time buttons apply one minute when clicked; their small arrow opens a menu with 1s, 10s, 30s, 1m, 5m, 10m, 20m and 30m, to add or remove any of these amounts immediately.
The device also has a WebPanel component, which shows the device name and the counter, with the same blinking. It is display-only — the transport buttons are not available on a WebPanel.
ActionGraph Node
CountDown
Starts a CountDown device. Available under Devices/CountDown in the ActionGraph node palette.
Properties:
- Device: The CountDown device to drive. Clicking it opens a picker listing every CountDown device in the show.
Input Slots:
- Start Time: Timecode — the value the count starts from.
- Target Time: Timecode — the value the count runs to. As in the actions, the order of the two decides whether it counts down or up.
- Quick Key: Integer — the QuickKey to fire when the target is reached. Use 0 for none.
Input Events:
- Start: Applies the three values above and starts the count immediately.
Info
Quick Key defaults to 1, not to 0, so a node left with its default value will fire QuickKey 1 when the countdown ends. Set it to 0 unless you really want a QuickKey.
The node always starts the countdown with blinking off. To use a blink threshold, start the device from a Command Cue or a QuickKey instead.
CountDown device or Countdown media?
Onlyview has two separate ways of putting a countdown on screen, and they are not interchangeable.
The Countdown media counts over the duration of its own cue. It is driven by the timeline: place the cue so that it ends where the next cue begins, and the media shows the time left before that cue. It needs no device, and it cannot be paused or extended independently of the timeline.
The CountDown device is a free-running timer, owned by the show and driven by the operator or by actions. It is not tied to any cue, and it can be paused, extended, shortened and reset at any time.
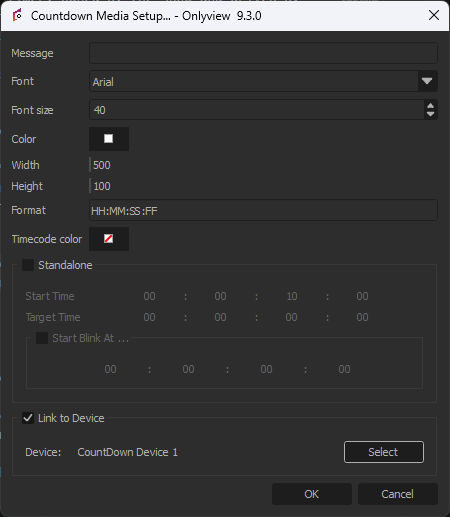
The two meet in the Countdown media's setup dialog, which offers a choice between two modes:
- Standalone — the media counts over its own cue, from Start Time to Target Time, as described above.
- Link to Device — click Select and pick a CountDown device. The media then simply displays that device's current value. Its own start and target times and its own cue timecode are ignored; the message, font, colours, format and size from the media setup still apply.
Once linked, the two stay in step: the device widget and the media show the same value at the same moment, on every machine of the show.
So the rule of thumb is:
- Use a standalone Countdown media when the countdown is a property of the show's running order — "time before the next sequence" — and is entirely decided by the timeline.
- Use a CountDown device when the countdown is a decision made live — a doors time, a break, an interval that may be stretched — and add a Countdown media linked to it whenever that timer also has to appear on a screen output rather than only on a UserScreen or WebPanel.
Info
A linked Countdown media is still a media: it is only visible while its own cue is playing. What the device changes is the value shown, not when the media appears.